Lock screen audio controls in React Native

If your app has audio features, allowing users to interact with these from the lock screen is a great way to improve your product's user experience.
Today we will walk you through how to implement these controls in your iOS and Android React Native app.
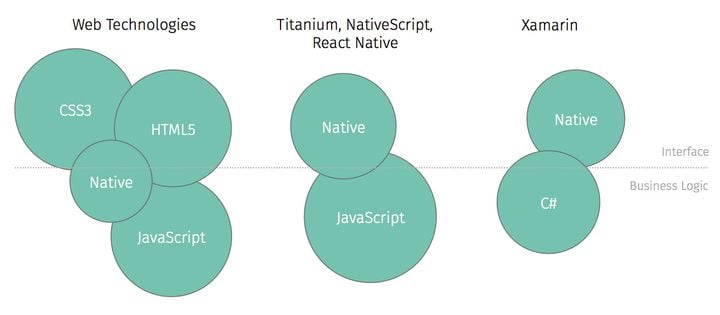
Background
While implementing an audio player for a multi-media app, we had the requirement of controlling app audio from the device's lock screen.
Although react-native-music-control got us most of the way there, we ultimately had to copy and modify their native modules to get everything working perfectly. Furthermore, this lock screen control service had to be managed independently from our audio service. This meant creating our own intermediary layer which subscribed to events and communicated between the audio service and remote lock screen service.
Since we implemented this feature there is now a more reliable solution in the form of the react-native-track-player library. Now instead of managing two different libraries with two different purposes, it is possible to use the same service for both! The library's website can be found here.
Now, let's walk through the steps of implementing lock screen audio controls in a modern React Native app.
Preparation
This guide assumes you have already set up a React Native app. If you are looking to start from scratch, you can follow the official documentation to get started and then pick up from here once you are up and running.
Audio library configuration
Before building our lock screen controls we are going to need some audio functionality in our app.
Selecting a library
If you have yet to begin your audio implementation, you should consider using react-native-track-player since it is a one-stop audio library which also seamlessly supports lock screen controls.
Other libraries are available, such as expo-av or react-native-sound, but they do not support lock screen controls. If you have already integrated one of these and migration is not an option, you might want to see whether the react-native-music-control package is enough to get you going.
Note: react-native-music-control is no longer receiving updates, so if lock screen controls are a deal-breaker for your product you might want to consider migrating.
expo-av + react-native-sound
If you have already integrated one of these libraries, you need to ensure background playback is enabled before following the usage guide for react-native-music-control.
For expo-av this can be done like so:
Audio.setAudioModeAsync({
    playsInSilentModeIOS: true,
    staysActiveInBackground: true,
    interruptionModeIOS: Audio.INTERRUPTION_MODE_IOS_DO_NOT_MIX,
});
Whereas if you are using react-native-sound it would look like this:
Sound.setCategory('Playback', false);
Enabling 'Background Modes' capability
Regardless of which audio library you are working with, you need to add a capability to your iOS target. You can achieve this by opening Xcode, entering your target's settings, and clicking 'Signing & Capabilities'.
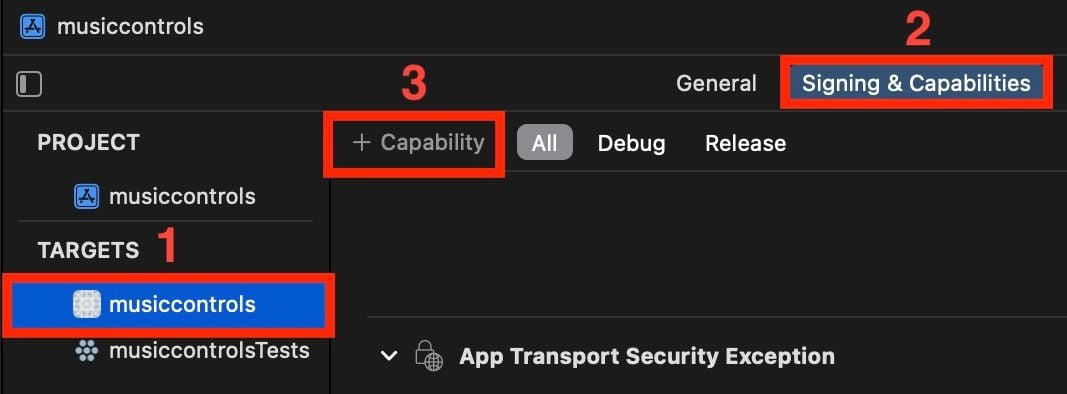
From here you need to add the 'Background Modes' capability with 'Audio' enabled.
This will allow for your playback service, which operates independently of the React Native DOM, to continue while the app runs in the background.
Setting up react-native-track-player
Configuring this library is fairly simple. First we begin by installing the package in the root of our project:
npm install --save react-native-track-player && npx pod-install
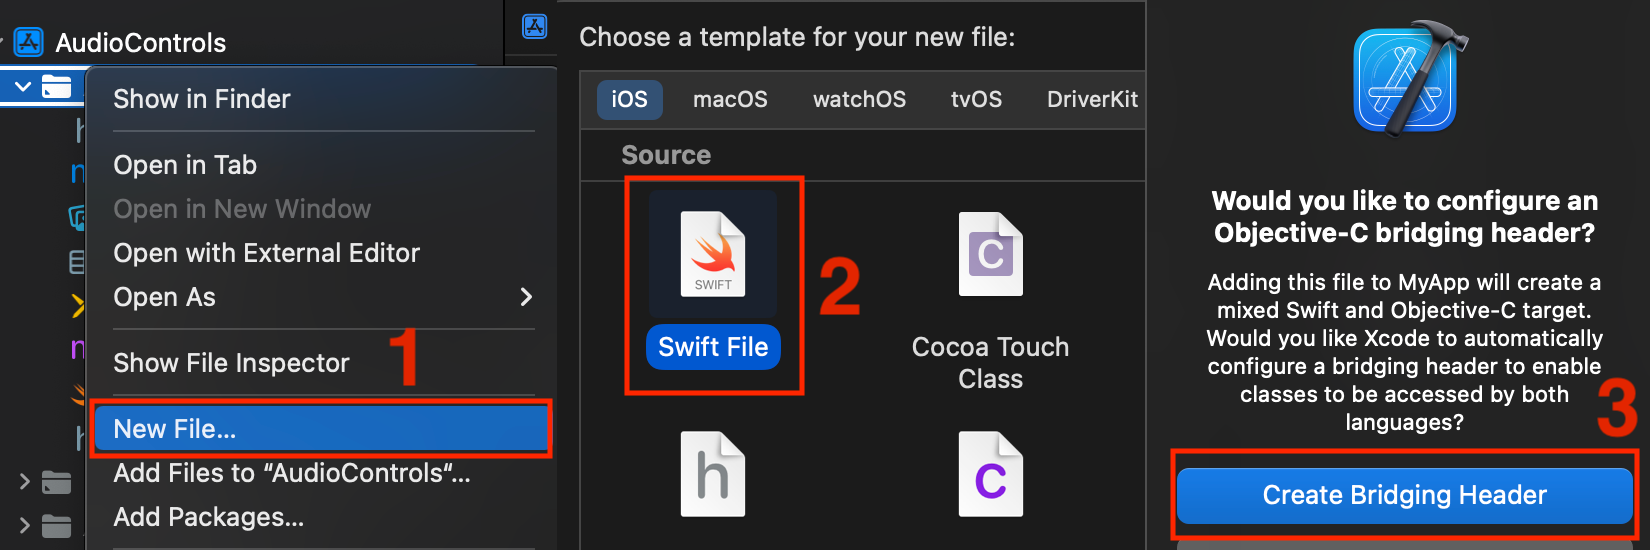
We then need to follow a couple of manual steps to further prepare our iOS project.
First, make sure you have enabled the 'Background Modes' capability as outlined above. We then need to ensure our iOS project has a Swift bridging header which allows our project to be mixed-language (Swift + Objective-C). Doing this is as easy as creating a single Swift file in our Xcode project.
Configuring your playback service
Remember that playback service we registered with Xcode? Now it is time to use it. This should be done in the entrypoint of your application (in my case this is the index.js file). Place it directly above wherever you are calling AppRegistry.registerComponent.
export const playbackService = async () => {
  TrackPlayer.addEventListener(Event.RemotePlay, () =>
    TrackPlayer.play());

  TrackPlayer.addEventListener(Event.RemotePause, () =>
    TrackPlayer.pause());
  );
};

TrackPlayer.registerPlaybackService(() => playbackService);
You can extend this playbackService function to handle many other events, such as Event.RemoteSkip or Event.RemoteSeek. You can see all the supported events in the official documentation.
Initialising the player
We have to implement one more piece of boilerplate code before we can start playing tracks.
In order to schedule and control audio we first need to initialise the TrackPlayer service. This is as easy as calling a function when your audio component mounts:
  const setupPlayer = () => {
    TrackPlayer.setupPlayer();
  };

  useEffect(() => {
    setupPlayer();
  }, []);
We also need to specify which lock screen controls capabilities are enabled for the player. This will influence which controls are available to the user on the lock screen. Make sure to await the the asynchronous setupPlayer function first, as we need the player to be ready:
const setupPlayer = async () => {
    await TrackPlayer.setupPlayer();
    TrackPlayer.updateOptions({
      capabilities: [
        Capability.Play,
        Capability.Pause,
        Capability.JumpForward,
        Capability.JumpBackward,
      ],
    });
};
In addition to customizing which of the many capabilities are shown on the lock screen, this is also a good place to define some of the several options available to further customise your player's behaviour. For example, we can specify how Android should behave when the app is closed:
TrackPlayer.updateOptions({
  android: {
    appKilledPlaybackBehavior: appKilledPlaybackBehavior.ContinuePlayback,
  },
});
Queueing and playing tracks
Now that our audio player is configured, it's time to line up some tracks. react-native-track-player uses a queue system to select and schedule multiple audio files.
Let's define a track using some placeholder details and assets and add it to the queue:
var track = {
    url: require('./assets/audio_file.mp3'),
    title: 'My Song',
    artist: 'Your Favorite Artist',
    album: 'A Timeless Record',
    artwork: require('./assets/album_cover.jpg'),
    duration: 402, // Seconds
};

const playAudio = async () => {
    await TrackPlayer.add(track);
    TrackPlayer.play();
};
It's that easy! Now we just need to hook up this function to some UI and we can try out our player:
return (
    <SafeAreaView style={styles.container}>
        <Button title="Start audio" onPress={playAudio} />
    </SafeAreaView>
);
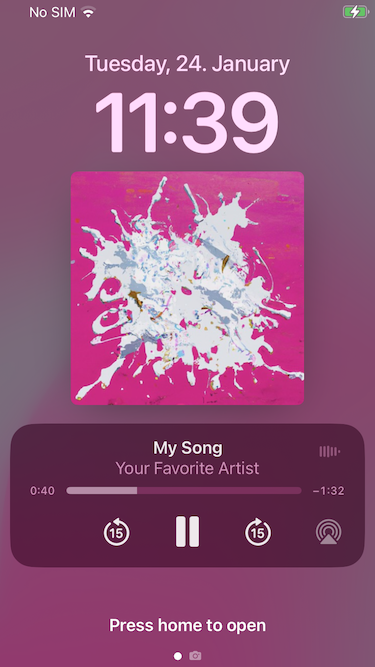
Enjoying the results
Now we can boot up the app on our device of choice (not a simulator) and try it out! If you followed all of the steps above you should be able to start the app and play your audio track.
More importantly, since we registered a playback service we can put the app into the background and the audio will continue playing. When we open the lock screen we are presented with the track details and the buttons should have the capabilities we specified earlier.
What next?
You should now have a good starting point for your app's audio handing functionality. What you add next is up to you!
A good place to start would be to extend the queue handling of TrackPlayer to support multiple tracks. Don't forget to extend your playback service to handle TrackPlayer.skipToPrevious and TrackPlayer.skipToNext.
Maybe you want to want to add download support for your network content? Or even streaming support? For this and many other guides please check out the library's official website.
Example repo
You can find a repo with an implementation of the steps outlined in this blog post here on GitHub.
If you want to read more about development with React Native, check out this blog post about custom fonts in react native or this blog post about implementing inline icons: b5x-stateful-inline-icon.