How to implement efficient app rating with React Native
User ratings and customer feedback are by far two of the most important metrics when it comes to marketing a mobile app.

User ratings and customer feedback are by far two of the most important metrics when it comes to marketing a mobile app. It will tell others what people think of your product and — if your rating is good — it will most likely help convert a significant percentage of them.
If getting the sought after *five stars rating* should probably be your objective (Pro-tip: You’ll need good developers and we can help you with that!), there comes a time when you have to think about the specifics of your app-rating flow, and how it will guide your users through the joy of writing a positive critique about your product.
In this article, we will work through a rating flow case-study and implement it with React Native from start to finish. We will use Redux and Typescript but this approach applies to any kind of JS stack.
Flow: When and where should I present the option to rate my app?
Let’s pretend we have an app that holds thousands of classified ads. From cars to household appliances, our customers can find anything they want.
A new requirement from the marketing department comes up: We need more positive user reviews, so let’s implement a call-to-action. Specifically, it will be a dialog where the user will be prompted to rate the app.
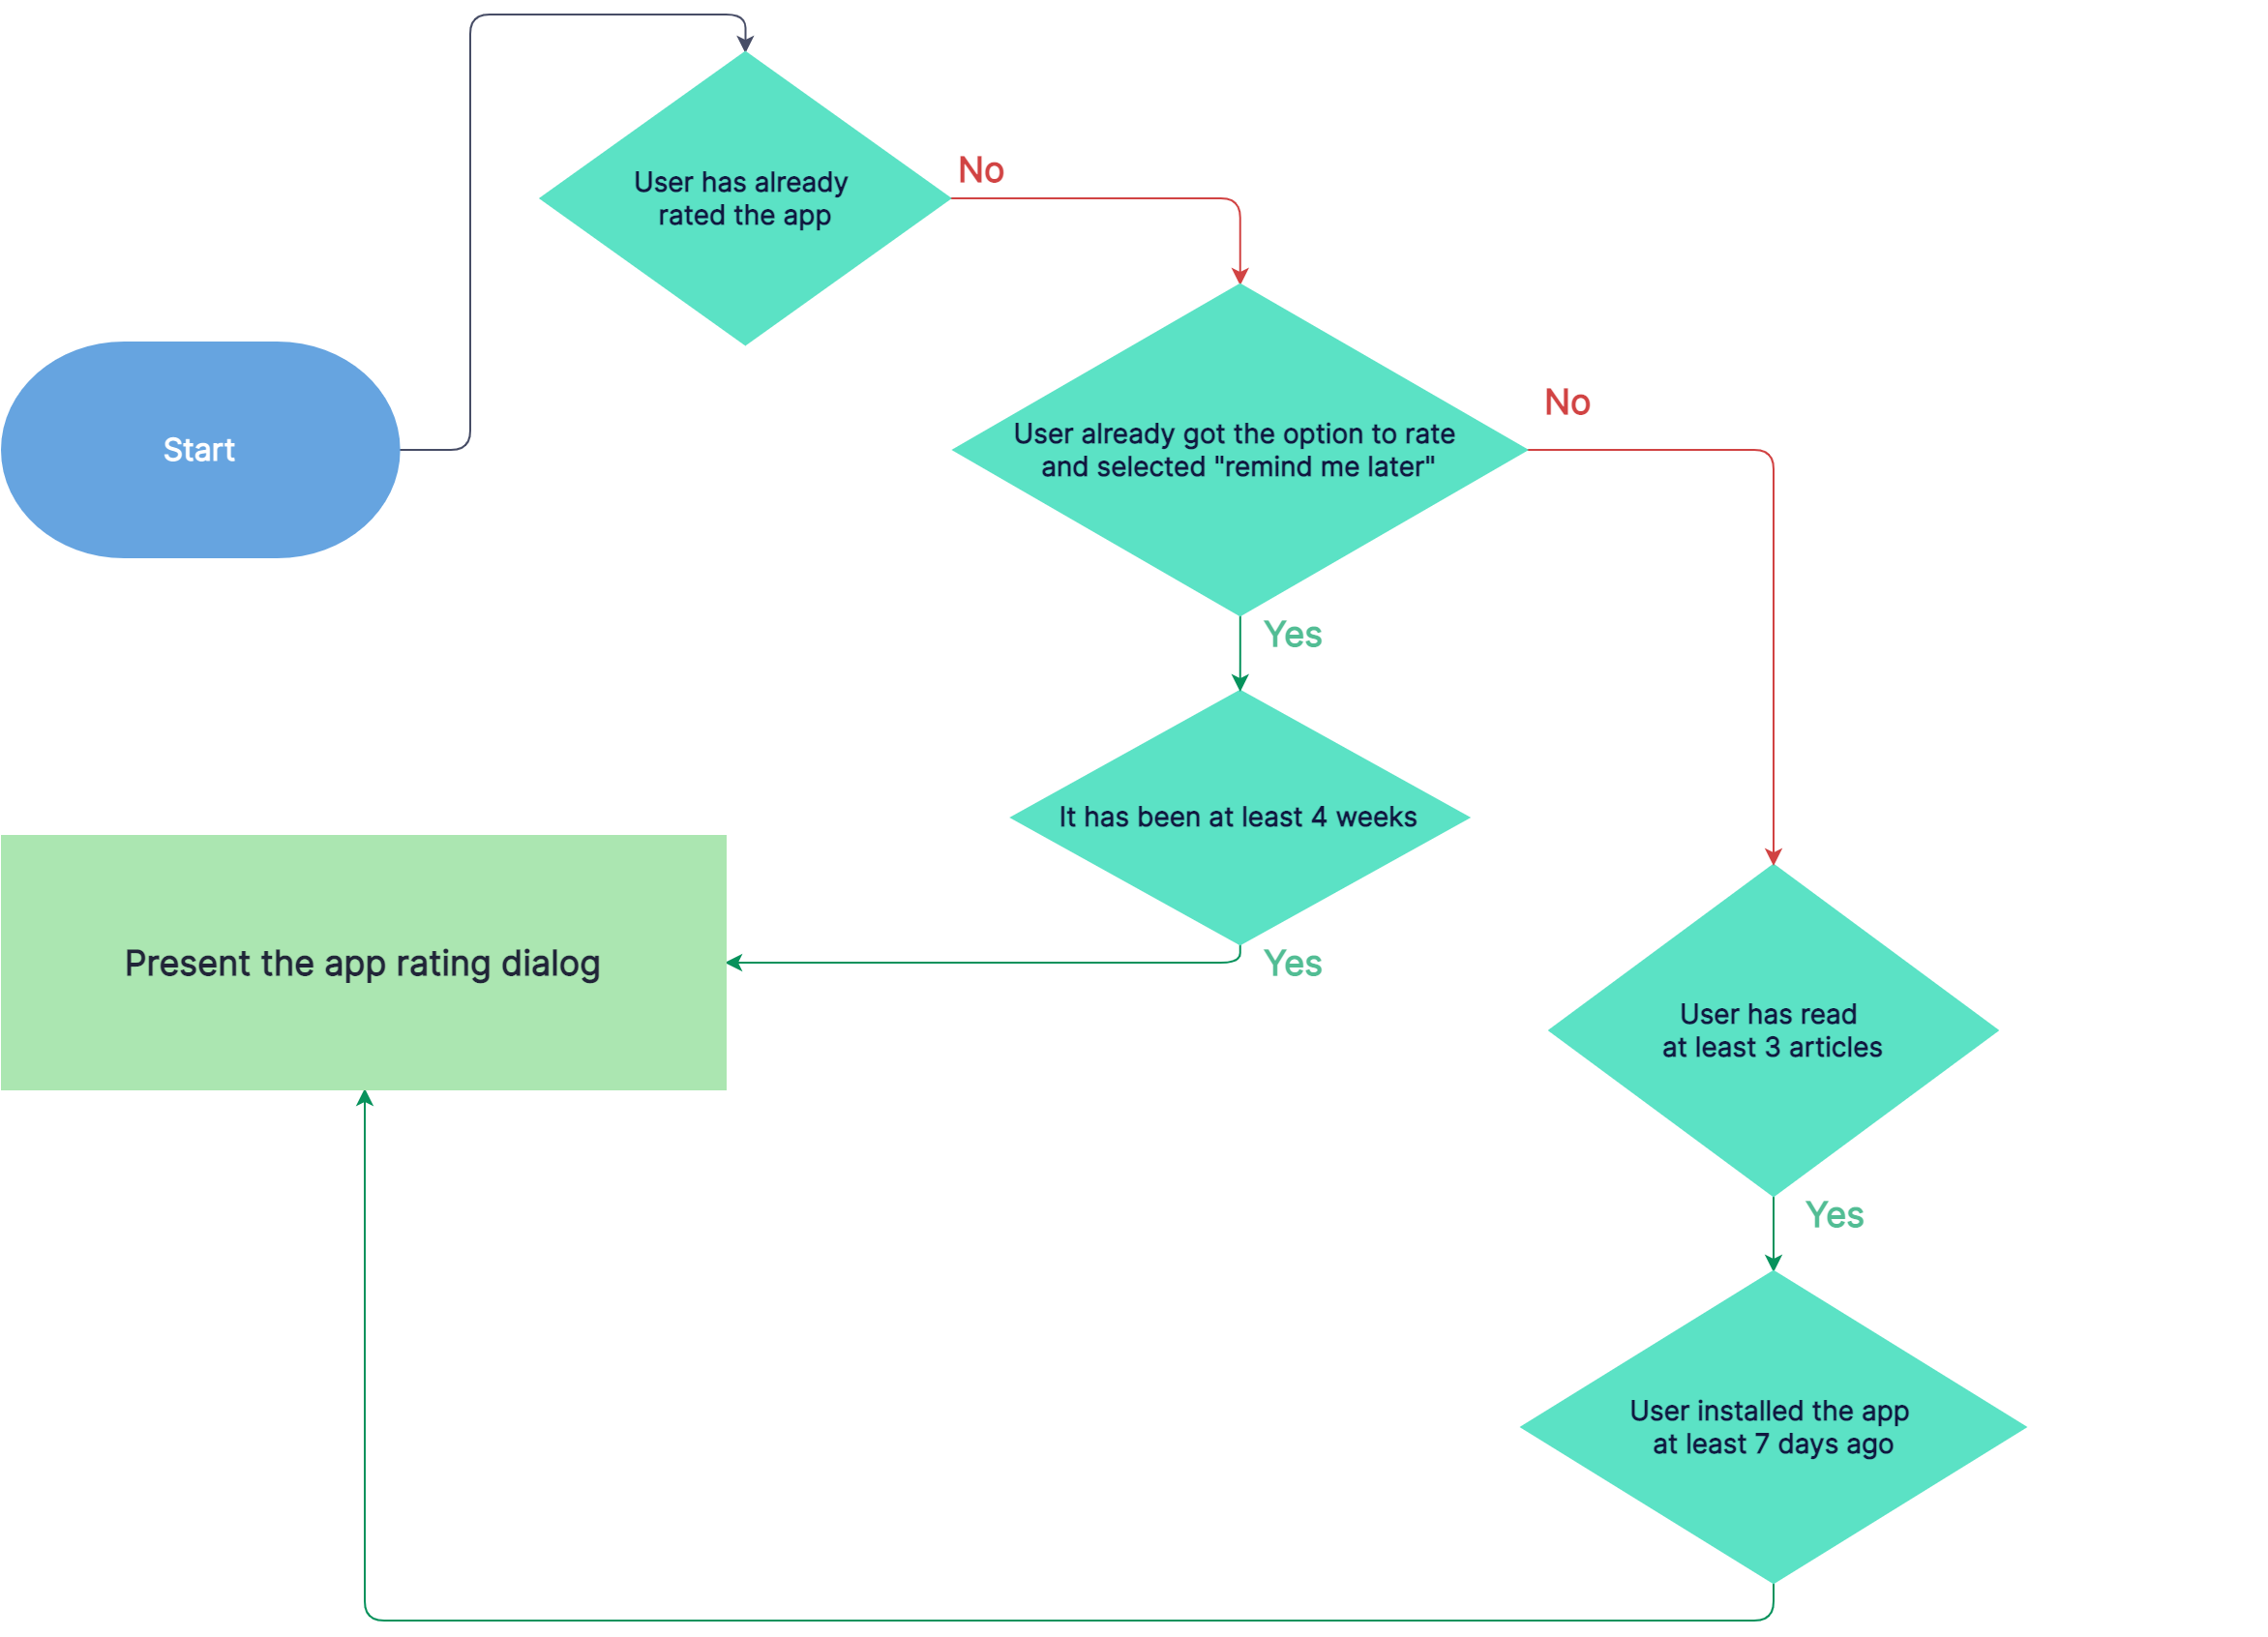
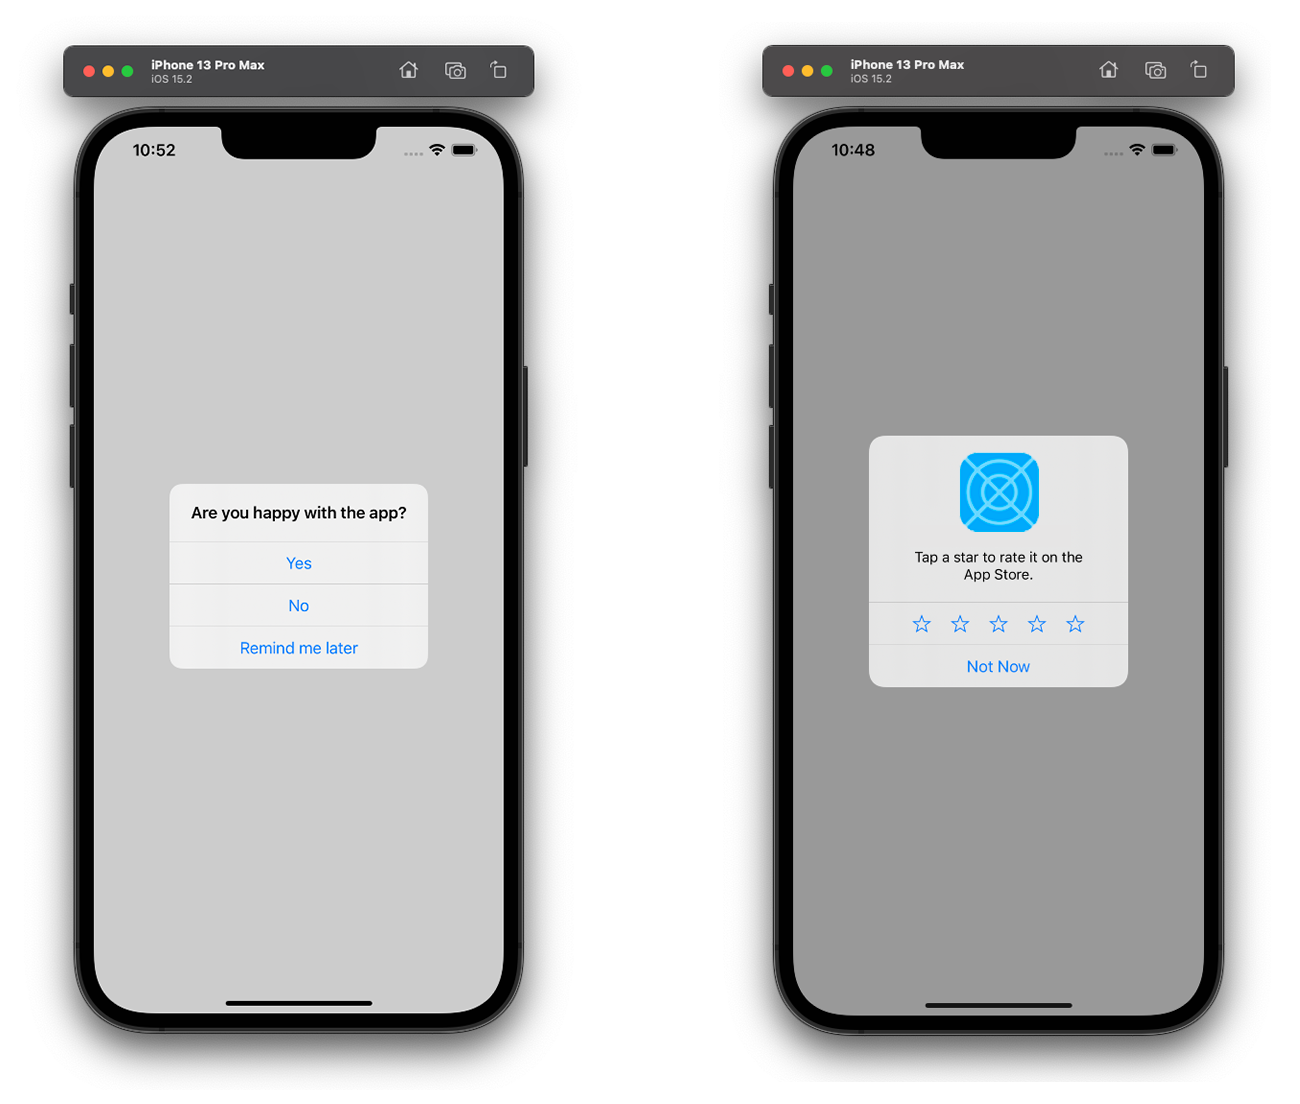
The user can select either "Yes" or "No" or "Remind Me Later". If "Yes" is selected then the user will have the option to rate the app from the dialog on iOS, and will be redirected to the Play Store on Android.
In order to decide when to show the dialog, the following criteria need to be met:
- The user must had read at least 3 articles
- The user must have installed the app at least 7 days ago
- If the user selects “remind me later”, the CTA will re-appear every four weeks

In order to have a good separation of concerns we will create a dedicated Redux store slice, conveniently named appRating.ts where we will store all the information needed to make a decision about when to show to app rating dialog to the user.
export interface AppRatingState {
  adsRead: string[];
  installDate: string;
  appRated: boolean;
  remindMeDate: string;
}

const slice = createSlice({
  name: 'appRating',
  initialState,
  reducers: {
    setInstallDate(state, { payload }: PayloadAction<string>) {
      state.installDate = payload;
    },
    setAppRated(state, { payload }: PayloadAction<boolean>) {
      state.appRated = payload;
    },
    setRemindMeLater(state, { payload }: PayloadAction<string>) {
      state.remindMeDate = payload;
    },
    setAdsReads(state, { payload }: PayloadAction<string> {
      state.adsRead = [
            ...new Set([...state.adsRead, payload]),
          ];
  },
});
With the basics in place, we can go ahead and implement the logic on the front-end.
Implementation: How to write an AppRating component
With React's very own component approach, a good design pattern is to create a dedicated component that will handle everything we need to process about the app rating flow.
We could technically handle this in Redux actions too but making a top level component it is the better React way of solving this specific problem.
We first need to make sure we're updating the user's install date.
const AppRating: FunctionComponent = () => {
  const installDate = useAppSelector(selectInstallDate);
  const dispatch = useAppDispatch();

  useEffect(() => {
    if (!installDate) {
      dispatch(setInstallDate(new Date().toISOString()));
    }
  }, []);
In our ad screen we won't forget to dispatch setAdsRead inside a similar useEffect hook so we can keep track of the amount of ads the user has opened.
We will then proceed to create a custom selector that will hold the logic presented above.
export const selectShouldShowRatingDialog = (state: RootState) => {
  const { adsRead, installDate, appRated, remindMeDate } = state.appRating;

  if (appRated) {
    return false;
  }

  const sevenDaysAfterInstall =
    new Date(installDate).getTime() < Date.now() - 7 * 24 * 60 * 60 * 1000;

  return (
    (!remindMeDate && adsRead.length >= 3 && sevenDaysAfterInstall) ||
    (remindMeDate && new Date(remindMeDate).getTime() < Date.now())
  );
};
We can then create another useEffect where we will trigger an Alert based on the value that returns the selector. We will use react-native-rate to present the call-to-action that will present the opportunity for the user to rate the app directly within the app on iOS, or through the play store on android.
Through this process we make sure to update our state variables like appRated or the remindMeLater date.
  const showRatingDialog = useAppSelector(selectShouldShowRatingDialog);

  useEffect(() => {
    if (!showRatingDialog) {
      return;
    }
    const options = {
      AppleAppID: 'our-apple-id',
      GooglePackageName: 'our-google-package-name',
      OtherAndroidURL:
        'https://play.google.com/store/apps/details?id=our-app',
      preferredAndroidMarket: AndroidMarket.Google,
      preferInApp: Platform.OS === 'ios',
      openAppStoreIfInAppFails: true
    };

    Alert.alert(
      'Are you happy with the app?',
      '',
      [
        {
          text: 'Yes',
          onPress: () => {
            dispatch(setAppRated(true));
            Rate.rate(options, (success, error) => {
              if (error) {
                if (Platform.OS === 'android') {
                  openURL(
                    'https://play.google.com/store/apps/details?id=our-app',
                    currentTheme
                  );
                }
                console.error(error);
              }
            });
          },
        },
        {
          text: 'No',
          onPress: () => {
            dispatch(setAppRated(true));
          },
        },
        {
          text: 'Remind me later',
          onPress: () => {
            const fourWeeksFromNow = Date.now() + 28 * 24 * 60 * 60 * 1000;
            dispatch(
              setRemindMeLater(new Date(fourWeeksFromNow).toISOString())
            );
          },
        },
      ]
    );
  }, [showRatingDialog]);
We can see that we're handling all front-end logic separately from the flow requirement, which helps us separate our concerns beautifully. By holding everything inside our AppRating component we're also decoupling this feature from the rest of the app, we can just insert the component at the top level and keep maintainability high in case of future new requirements.

With our app rating flow implemented in the app, we can make sure our users stop by and leave great feedback about our product. In many cases, we found that actively soliciting reviews from our users was increasing the number of positive notes, as opposed to waiting for complaints and missing out on all the great things the users have to say about their experience.
With a clean separation of concerns and a simple approach to code hierarchy, we successfully implemented a call-to-action that will be a tremendous help in bringing new users in. Such a feature pattern is an excellent way to boost up our user conversion rate and might bring in some constructive feedback our way!
If you want to read more about development with React Native, check out this blog post about implementing in-app purchases with RevenueCat in React Native or this blog post as an introduction to React Navigation modals, stacks, tabs, and overlays.


