Using Redux in Flutter: Part 1 - Redux setup and basic state management

In this article we're gonna build a simple Flutter app and use Redux to manage the state of our app. If you need an introduction about Redux and why you might want to use it in your apps, here are some links that are helpful to get you familiar with Redux and the concepts that it's built upon:
If you need a quick introduction check out the first part of our other blog post on how to use Redux in Ionic.
Before we start I should mention that the app that we're gonna build is really simple and definitely can be built in one or two widgets without using Redux. The goal here is to demonstrate how to use Redux in a simple Flutter app with clear explanation. Hopefully by the end of this article you can easily transfer the concepts to much more complicated contexts.
Create a Flutter app
Create a new flutter project and name it as you wish but don't use a name that might conflict with the dependencies that you want to add to your project. For example don't call it flutter_redux because that's the library we're gonna use as a dependency.
$ flutter create sample_flutter_redux_app
Replace the contents of lib/main.dart file with the following code.
// lib/main.dart
import 'package:flutter/material.dart';

void main() => runApp(MyApp());

class MyApp extends StatelessWidget {
  @override
  Widget build(BuildContext context) {
    return MaterialApp(
      title: 'Flutter Redux Demo',
      home: Scaffold(
        appBar: AppBar(
          title: Text('Flutter Redux Demo'),
        ),
        body: Center(
          child: Text('Flutter Redux app'),
        ),
      ),
    );
  }
}
You can already run the app using flutter run command and you should see the app bar and the text widget centered on the screen.
Redux setup
Next we'll add the Redux dependencies to our app. Check the libraries redux and flutter_redux on packages website and add them to the pubspec.yaml file with the latest version of each package.
# pubspec.yaml
dependencies:
  # other dependencies...
  redux: ^3.0.0
  flutter_redux: ^0.5.3
First thing we need to do, before going into the details of our app state management, is to set up Redux store and verify that it's working. We want to set up a Redux store with a very simple state as our app state for the beginning. Our simple state is just a boolean value. As an overview here is what we're gonna do:
- Model the app state.
- Define an Action.
- Add the reducers of the state.
- Define store with an initial state.
- Connect to the Store and dispatch an action.
App state model
Create a directory called models and two files called app_state.dart and models.dart. Add the following code to app_state.dart:
// lib/models/app_state.dart
import 'package:meta/meta.dart';

@immutable
class AppState {
  final bool reduxSetup;

  const AppState({
    @required this.reduxSetup,
  });
}
This is our simple app state to start with. We have only one boolean class member and a constructor. There are some important details here to note. One of the basic principles of Redux is the immutability of the state object, which means the state object is not to be mutated to update the state but is to be transferred from previous state to the new state by creating a new object that replaces the previous one. You can read about immutability in Redux and its motivation and benefits here redux.js.org/faq/immutable-data. The immutability of the state object here is achieved by @immutable annotation of the class, final keyword on class members and const constructor of the class. Defining the constructor with named parameters makes reducers definition more readable as we'll see later. Whether the parameters are @required or not depends on the logic of your state management but as a rule of thumb annotate parameters as @required unless you need to do otherwise. package:meta/meta.dart is imported for @immutable annotation.
We use models.dart file to export all models. This way to use the models we only need to import models.dart in other files. You will find this very convenient when you have many models defined in multiple files, which is the case most of the times, and you can access them by only importing one file. So for that reason we export app_state.dart from models.dart:
// lib/models/models.dart
export 'app_state.dart';
Actions
Actions are objects that have a type and some optional payload. The type describes the intent of the action and the payload is the data that goes with the action. Sometimes the type of the action is all the information that you need to transfer the state, in which case the action doesn't need a payload.
Let's define an action. We'll add all the actions in one file lib/actions/actions.dart
// lib/actions/actions.dart
class TestAction {
  final bool testPayload;

  TestAction(this.testPayload);
}
We define a class which is in fact a user defined Type and that's how we set the type of our action, here TestAction. The payload here is a boolean class member which is defined in the constructor of the class.
Reducers
The root reducer combines all the reducers that build different pieces of state. It's also called app reducer. Let's create reducers directory and two files app_reducer.dart and test_reducer.dart for our reducers:
// lib/reducers/app_reducer.dart
import 'package:sample_flutter_redux_app/models/models.dart';
import 'package:sample_flutter_redux_app/reducers/test_reducer.dart';

AppState appReducer(AppState state, action) {
  return AppState(
    reduxSetup: testReducer(state.reduxSetup, action),
  );
}
The testReducer is defined to receive the TestAction and return a new state based on the payload:
// lib/reducers/test_reducer.dart
import 'package:redux/redux.dart';
import 'package:sample_flutter_redux_app/actions/actions.dart';

final testReducer = TypedReducer<bool, TestAction>(_testActionReducer);

bool _testActionReducer(bool state, TestAction action) {
  return action.testPayload;
}
The first type parameter of TypedReducer is the type of the state that is received and returned by this reducer, and the second parameter is the type of the action that this reducer handles. The function that is passed to the TypedReducer is the actual reducer function that returns the new state.
Store
We have the minimum requirements to define our Redux store. We'll do that in main.dart file. Update main.dart file as shown below:
// lib/main.dart
import 'package:flutter/material.dart';
import 'package:redux/redux.dart';
import 'package:flutter_redux/flutter_redux.dart';
import 'package:sample_flutter_redux_app/models/models.dart';
import 'package:sample_flutter_redux_app/reducers/app_reducer.dart';

void main() {
  final store = Store<AppState>(
    appReducer,
    initialState: AppState(reduxSetup: true),
  );

  runApp(StoreProvider(store: store, child: MyApp()));
}

class MyApp extends StatelessWidget {
  @override
  Widget build(BuildContext context) {
    return MaterialApp(
      title: 'Flutter Redux Demo',
      home: Scaffold(
        appBar: AppBar(
          title: Text('Flutter Redux Demo'),
        ),
        body: Center(
          child: Text('Flutter Redux app'),
        ),
      ),
    );
  }
}
We have defined the store with the app reducer as root reducer and an initial state. Now before passing our app widget to runApp function we wrap it inside the StoreProvider which will provide the store to all the widgets in the widget tree.
We should have a working Redux store so let's print the app state and see how it works.
// lib/main.dart
...
void main() {
  final store = Store<AppState>(
    appReducer,
    initialState: AppState(reduxSetup: true),
  );

  print('Initial state: ${store.state}');

  runApp(StoreProvider(store: store, child: MyApp()));
}
...
If I reload the app I see a flutter log like this:
Initial state: Instance of 'AppState'
We've got some state object here but the log is not much helpful. There's a solution for that and it's overriding toString method of our model class. Override toString method of AppState as below and you can see more of the state.
// lib/models/app_state.dart
import 'package:meta/meta.dart';

@immutable
class AppState {
  ...
  @override
  String toString() {
    return 'AppState: {reduxSetup: $reduxSetup}';
  }
}
If you reload this time you'll see:
Initial state: AppState {reduxSetup: true}
You can override the toString method to return your desired formatted string of the state object. Later we'll see a better way to do that as our state becomes more complicated.
Now update the lib/main.dart file to connect it to the Redux store:
// lib/main.dart
import 'package:flutter/material.dart';
import 'package:redux/redux.dart';
import 'package:flutter_redux/flutter_redux.dart';
import 'package:sample_flutter_redux_app/models/models.dart';
import 'package:sample_flutter_redux_app/reducers/app_reducer.dart';
import 'package:sample_flutter_redux_app/actions/actions.dart'; // import actions

void main() {
  final store = Store<AppState>(
    appReducer,
    initialState: AppState(reduxSetup: false), // Set initial state to false
  );

  print('Initial state: ${store.state}');

  runApp(StoreProvider(store: store, child: MyApp()));
}

class MyApp extends StatelessWidget {
  @override
  Widget build(BuildContext context) {
    return MaterialApp(
      title: 'Flutter Redux Demo',
      home: Scaffold(
        appBar: AppBar(
          title: Text('Flutter Redux Demo'),
        ),
        // Connect to the store
        body: StoreConnector<AppState, bool>(
          converter: (Store<AppState> store) => store.state.reduxSetup,
          builder: (BuildContext context, bool reduxSetup) {
            return Center(
              child: Column(
                mainAxisAlignment: MainAxisAlignment.center,
                children: <Widget>[
                  Text('Redux is working: $reduxSetup'),
                  RaisedButton(
                    child: Text('Dispatch action'),
                    onPressed: () => StoreProvider.of<AppState>(context)
                        .dispatch(TestAction(true)),
                  ),
                ],
              ),
            );
          },
        ),
      ),
    );
  }
}
We have imported actions, set the initial state and connected our build method to the Redux store using the StoreConnector.
As you can see StoreConnector requires a convertor which is a function that receives the store and returns the part of the state that we're interested in. In other words it converts the store to our desired data.
The builder property is a function similar to conventional builder methods in Flutter with the difference that it can also access the state that is returned by the convertor, here a boolean variable. You can see how the variable is used in a Text widget.
Finally to dispatch our TestAction we use the StoreProvider of context, passing an instance of TestAction with the payload to the dispatch method. Another way of dispatching actions, without using StoreProvider, is to define a function in the convertor which is shown further ahead.
Rerun the app and pressing the button should update the state and rebuild the widget with the new data.
The sample app
Now that we have a working Redux setup let's define a sample app so that we can introduce different concepts and techniques in the context of our app.
As you can see in the demo below we have some sliders and shapes with different properties that are adjusted using the sliders. The values of each controller section are reflected in the box beside it and the result of all adjustments is reflected in the box at the top.
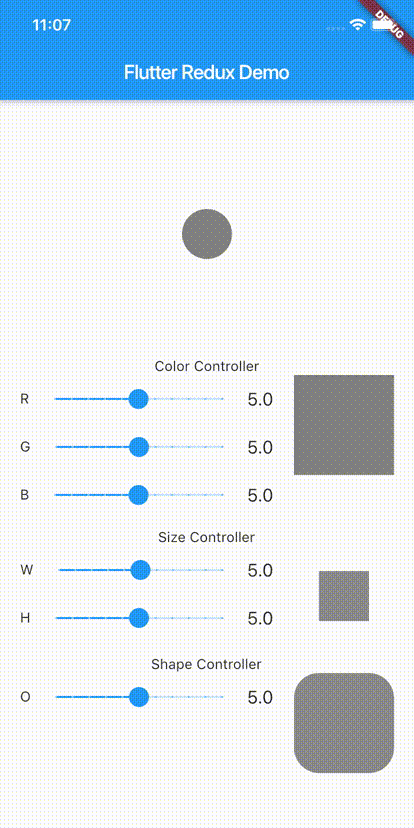
The idea here is to have separate widgets for each section and box and use Redux state and actions to connect all the widgets together without passing props and callbacks around while keeping the amount of stateful widgets to minimum. In a real world example these widgets could be screens or widgets in different screens.
We will go through building the app in the next sections and you can also refer to the complete sample project: github.com/hybridheroes/flutter_redux_example_app
Color section
Widgets
Let's start with the color section. As you can see the slider widget is used multiple times and it makes sense to create one slider with our specific requirements so that we can reuse it in different sections. Add the following code to lib/my_slider.dart:
// lib/my_slider.dart
import 'package:flutter/material.dart';

class MySlider extends StatefulWidget {
  final double value;
  final String label;
  final void Function(double) onChanged;

  MySlider(
      {@required this.value, @required this.label, @required this.onChanged});

  @override
  _MySliderState createState() => _MySliderState();
}

class _MySliderState extends State<MySlider> {
  @override
  Widget build(BuildContext context) {
    return Row(
      children: <Widget>[
        Text(
          '${widget.label}',
        ),
        Expanded(
          child: Slider(
            value: widget.value,
            min: 0,
            max: 10,
            divisions: 10,
            onChanged: widget.onChanged,
          ),
        ),
        Text(
          '${widget.value}',
          style: TextStyle(
            fontSize: 18,
          ),
        ),
      ],
    );
  }
}
We use MySlider widget in the widgets for controller sections as shown here for ColorCotroller widget. Initially we create the ColorController as a stateful widget so that out sliders are functional but later when the slider state comes from the Redux store, we will change this widget to a stateless widget. Add the following code to lib/color_controller.dart:
// lib/color_controller.dart
import 'package:flutter/material.dart';
import 'package:sample_flutter_redux_app/my_slider.dart';

class ColorController extends StatefulWidget {
  @override
  _ColorControllerState createState() => _ColorControllerState();
}

class _ColorControllerState extends State<ColorController> {
  double _red = 5.0;
  double _green = 5.0;
  double _blue = 5.0;

  @override
  Widget build(BuildContext context) {
    return Column(
      children: <Widget>[
        MySlider(
          value: _red,
          label: 'R',
          onChanged: (val) {
            setState(() {
              _red = val;
            });
          },
        ),
        MySlider(
          value: _green,
          label: 'G',
          onChanged: (val) {
            setState(() {
              _green = val;
            });
          },
        ),
        MySlider(
          value: _blue,
          label: 'B',
          onChanged: (val) {
            setState(() {
              _blue = val;
            });
          },
        ),
      ],
    );
  }
}
The result of color adjustments will be shown in ColorBox widget defined in lib/color_box.dart file:
// lib/color_box.dart
import 'package:flutter/material.dart';

class ColorBox extends StatelessWidget {
  @override
  Widget build(BuildContext context) {
    return Container(
      width: 100,
      height: 100,
      child: Center(
        child: Container(
          width: 100,
          height: 100,
          color: Colors.black45,
        ),
      ),
    );
  }
}
Let's put them all together in lib/main.dart to have them rendered:
// lib/main.dart
import ...
import 'package:sample_flutter_redux_app/color_box.dart';
import 'package:sample_flutter_redux_app/color_controller.dart';

void main() {
  ...
}

class MyApp extends StatelessWidget {
  @override
  Widget build(BuildContext context) {
    return MaterialApp(
      title: 'Flutter Redux Demo',
      home: Scaffold(
        appBar: AppBar(
          title: Text('Flutter Redux Demo'),
        ),
        body: Padding(
          padding: EdgeInsets.all(20),
          child: ListView(
            children: <Widget>[
              Container(
                padding: EdgeInsets.only(top: 10),
                child: Column(
                  children: <Widget>[
                    Text('Color Controller'),
                    Row(
                      crossAxisAlignment: CrossAxisAlignment.start,
                      children: <Widget>[
                        Expanded(
                          child: Padding(
                            padding: EdgeInsets.only(right: 20),
                            child: ColorController(),
                          ),
                        ),
                        ColorBox(),
                      ],
                    ),
                  ],
                ),
              ),
            ],
          ),
        ),
      ),
    );
  }
}
We already use a ListView widget because as we add the other sections, depending on the device size we might need scrolling on the screen.
State
Generally when defining Redux state it's better to start by modeling the state shape and build the actions and reducers based on the model.
The object model of our box color is defined in lib/models/box_color.dart:
// lib/models/box_color.dart
import 'dart:convert';
import 'package:meta/meta.dart';

@immutable
class MyBoxColor {
  final double red;
  final double green;
  final double blue;

  const MyBoxColor({
    @required this.red,
    @required this.green,
    @required this.blue,
  });

  MyBoxColor copyWith({double red, double green, double blue}) {
    return MyBoxColor(
      red: red ?? this.red,
      green: green ?? this.green,
      blue: blue ?? this.blue,
    );
  }

  dynamic toJson() => {
        'red': red,
        'green': green,
        'blue': blue,
      };

  @override
  String toString() {
    return 'MyBoxColor: ${JsonEncoder.withIndent('  ').convert(this)}';
  }
}
Here we have overridden the toString method in a different way than what we saw earlier. As your objects become more complex it becomes cumbersome to hard-code every class member and the string formatting that you desire for printing the object. A convenient way of handling that is to use JsonEncoder from dart:convert package to encode the object as a JSON object and then convert it to string with indentation as shown above. For this to work you need to also define a toJson method that is used by JsonEncoder to create the JSON object from the class instance.
We have also defined a method copyWith which returns a new MyBoxColor instance by receiving one or more of the class members red, green or blue. This is useful when you want to update some part of a state object but want to retain the rest of the object properties as they are. In our case we want to adjust one color at a time and keep the other two untouched.
Next export the new model from lib/models/models.dart file and use it in AppState as shown below:
// lib/models/models.dart
export 'app_state.dart';
export 'box_color.dart';
// lib/models/app_state.dart
import 'dart:convert';
import 'package:meta/meta.dart';
import 'package:sample_flutter_redux_app/models/models.dart';

@immutable
class AppState {
  final MyBoxColor boxColor;

  const AppState({
    @required this.boxColor,
  });

  dynamic toJson() => {
        'boxColor': boxColor,
      };

  @override
  String toString() {
    return 'AppState: ${JsonEncoder.withIndent('  ').convert(this)}';
  }
}
The action used to update the shape is defined as below in the lib/actions/actions.dart file:
// lib/actions/actions.dart
import 'package:sample_flutter_redux_app/models/models.dart';

class SetColor {
  final MyBoxColor boxColor;

  SetColor(this.boxColor);
}
SetColor is the type of the action and the payload is a MyBoxColor called boxColor.
The reducer that receives this action is defined in lib/reducers/color_reducer.dart:
// lib/reducers/color_reducer.dart
import 'package:redux/redux.dart';
import 'package:sample_flutter_redux_app/actions/actions.dart';
import 'package:sample_flutter_redux_app/models/models.dart';

final colorReducer = TypedReducer<MyBoxColor, SetColor>(_setColorReducer);

MyBoxColor _setColorReducer(MyBoxColor state, SetColor action) {
  return action.boxColor;
}
The type of the state that is received and returned here is MyBoxColor and the action type is SetColor as defined using TypedReducer. _setColorReducer function simply returns the new box color that is the action payload.
Update the appReducer to return our new app state using the new reducer:
// lib/reducers/appReducer.dart
import 'package:sample_flutter_redux_app/models/models.dart';
import 'package:sample_flutter_redux_app/reducers/color_reducer.dart';

AppState appReducer(AppState state, action) {
  return AppState(
    boxColor: colorReducer(state.boxColor, action),
  );
}
You can delete lib/reducers/test_reducer.dart file since it's not used anymore.
Now that our state shape is updated we need to also update the store definition in lib/main.dart:
// lib/main.dart
import ...
import 'package:redux_logging/redux_logging.dart';

void main() {
  final initialState = AppState(
    boxColor: MyBoxColor(
      red: 5.0,
      green: 5.0,
      blue: 5.0,
    ),
  );

  final store = Store<AppState>(
    appReducer,
    initialState: initialState,
    middleware: [new LoggingMiddleware.printer()],
  );

  print('Initial state: ${store.state}');

  runApp(StoreProvider(store: store, child: MyApp()));
}
...
Here we have defined an initial state based on the new state shape.
We have also added a middleware to the Redux store which is called LoggingMiddleware. Redux logging middleware is very useful to see exactly what is happening in your Redux store and it's an essential development tool when using Redux in flutter. Make sure you have the package in your pubspec.yaml file:
dependencies:
  ...
  redux_logging: ^0.3.0
We connect the ColorBox widget (lib/color_box.dart) to the Redux store with the same method as we saw earlier in our test setup:
// lib/color_box.dart
import 'package:flutter/material.dart';
import 'package:redux/redux.dart';
import 'package:flutter_redux/flutter_redux.dart';
import 'package:sample_flutter_redux_app/models/models.dart';
import 'package:sample_flutter_redux_app/selectors/selectors.dart';

class ColorBox extends StatelessWidget {
  @override
  Widget build(BuildContext context) {
    return StoreConnector<AppState, Color>(
      converter: (Store<AppState> store) => colorSelector(store.state.boxColor),
      builder: (BuildContext context, Color color) {
        return Container(
          width: 100,
          height: 100,
          child: Center(
            child: Container(
              width: 100,
              height: 100,
              color: color,
            ),
          ),
        );
      },
    );
  }
}
There's a minor difference here in the convertor fuction and that is the usage of colorSelector function. Selectors in Redux are functions that are used to return some object derived from the current state. They might combine different parts of state or build more useful data from the raw state object. The colorSelector is used to create a Flutter Color from the boxColor state.
colorSelector is defined in lib/selectors/selectors.dart:
// lib/selectors/selectors.dart
import 'package:flutter/material.dart';
import 'package:sample_flutter_redux_app/models/models.dart';

colorSelector(MyBoxColor boxColor) {
  return Color.fromRGBO((boxColor.red * 25.5).round(),
      (boxColor.green * 25.5).round(), (boxColor.blue * 25.5).round(), 1);
}
The convertor returns a Flutter Color built by colorSelector and the builder function makes use of it to render the box.
For the ColorController we take another approach which is using ViewModels:
// lib/color_controller.dart
import 'package:flutter/material.dart';
import 'package:redux/redux.dart';
import 'package:flutter_redux/flutter_redux.dart';
import 'package:sample_flutter_redux_app/models/models.dart';
import 'package:sample_flutter_redux_app/actions/actions.dart';
import 'package:sample_flutter_redux_app/my_slider.dart';

class ColorController extends StatelessWidget {
  @override
  Widget build(BuildContext context) {
    return StoreConnector(
      converter: (Store<AppState> store) => _ViewModel.fromStore(store),
      builder: (BuildContext context, _ViewModel vm) {
        return Column(
          children: <Widget>[
            MySlider(
              value: vm.boxColor.red,
              label: 'R',
              onChanged: (val) {
                vm.onColorChanged(vm.boxColor.copyWith(red: val));
              },
            ),
            MySlider(
              value: vm.boxColor.green,
              label: 'G',
              onChanged: (val) {
                vm.onColorChanged(vm.boxColor.copyWith(green: val));
              },
            ),
            MySlider(
              value: vm.boxColor.blue,
              label: 'B',
              onChanged: (val) {
                vm.onColorChanged(vm.boxColor.copyWith(blue: val));
              },
            ),
          ],
        );
      },
    );
  }
}

class _ViewModel {
  final MyBoxColor boxColor;
  final Function(MyBoxColor) onColorChanged;

  _ViewModel({@required this.boxColor, @required this.onColorChanged});

  static _ViewModel fromStore(Store<AppState> store) {
    return _ViewModel(
      boxColor: store.state.boxColor,
      onColorChanged: (MyBoxColor boxColor) {
        store.dispatch(SetColor(boxColor));
      },
    );
  }
}
The _ViewModel is a class that we use to define the state and the actions that are gonna be used in the widget. It's a good way to abstract away the model of the state in your widget from the presentation of the widget. Otherwise your convertor and builder methods will quickly make your build method difficult to read and maintain.
As you can see in the _ViewModel the state that we're interested in here is the boxColor and the action that we want to dispatch is SetColor which is dispatched in the onColorChanged function. To return a _ViewModel the static method fromStore is defined to receive the store and return a _ViewModel instance.
Please study how the _ViewModel is used in the build method and notice that the widget is not stateful anymore. The underscore (_) in the _ViewModel is to not export it from this file since it is specifically defined for this widget and normally each widget has it's own _ViewModel.
Reload the app and you should be able to adjust the color of the box using the sliders. You should also be able to see all the actions and state updates in flutter logs because we added Redux logging middleware.
The other sections can be extended in the same way as the color section. Please check the related git revision to see the changes required:
github.com/hybridheroes/flutter_redux_example_app/commit/081fbfd6
What's next
That concludes the first part of our Flutter + Redux article. In the upcoming parts we will make use of some more advanced concepts such as:
- How to handle asynchronous actions, make network requests and dispatch thunk actions.
- How your app navigation works together with Redux store.
- How to persist your app state and start your app with rehydrated state.
You can find Part 2 of this article, "Thunk actions" here: flutter redux middleware
Or learn more about getting started with Redux Toolkit in React Native here: redux toolkit react native
Photo by Michael Drexler on Unsplash