How To Speed Up React Native Development using Typescript: Walkthrough and Tutorial

As your React Native project gets larger and more complex, it is quickly becoming vital to use type-checking to ensure a clean type architecture and avoid some of Javascript's pitfalls. We will be discussing how to implement Typescript in your project and how to speed up development processes using its powerful features.
What is TypeScript ?
In essence, TypeScript adds optional static typings to JavaScript – static meaning it can identify type errors before you run the code. More specifically TypeScript is a typed superset of JavaScript that compiles to plain JavaScript, which means it can run in any browser, Node.js or any JS engine.
Static Type Checking in React/React Native
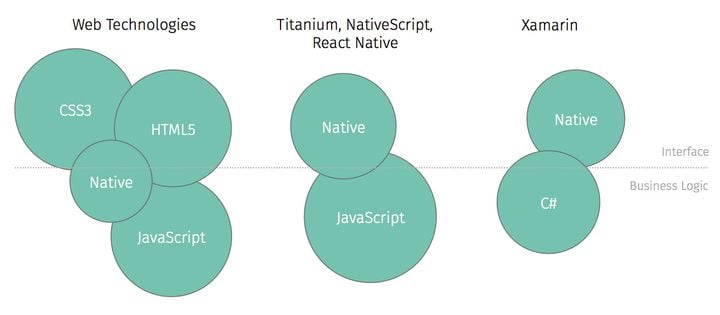
With React/ React Native you usually have 3 choices for static type checking: PropTypes, Flow or TypeScript
-
PropTypes is a built-in type checker which allows you to type check props on a component.
The people at React recommend using JS extensions like Flow or Typescript instead as they type check your whole application. -
Flow is a static type checker developed by Facebook. Similar to typescript it lets you annotate the variables, functions, and React components with a special type syntax.
Why TypeScript is superior to Flow
Opinions may differ but TypeScript is preferred over Flow for the following reasons:
- VS Code adds your imports automatically.
- Best autofixing linter.
- Better error messages.
- Flow requires files to be annotated with
//@flowat the beginning of the file, in order for the file to be type checked – this is not only tedious but also prone to errors, because it can be forgotten.
Add TypeScript to your React Native project
Run the following command to install necessary dependencies:
npm install --save-dev typescript react-native-typescript-transformer @types/react @types/react-native
This will add TypeScript, React Native TypeScript Transformer and TypeScript typings for React and React Native to your project.
Add a typescript config file named tsconfig.json with the following content:
{
  "compilerOptions": {
    "target": "es2015",
    "jsx": "react",
    "noEmit": true,
    "moduleResolution": "node",
    "importHelpers": true,
    "lib": ["es2015", "es2016"],
    "allowSyntheticDefaultImports": true
  },
  "exclude": ["node_modules"]
}
Then add a config file for the React Native TypeScript Transformer named rn-cli.config.js with the following content:
module.exports = {
  getTransformModulePath() {
    return require.resolve('react-native-typescript-transformer');
  },
  getSourceExts() {
    return ['ts', 'tsx'];
  },
};
Adding this file basically means that the package should expect .ts and .tsx files and should use react-native-typescript-transformer to compile source codes.
Migrating to TypeScript
Except for the index.js file in the root folder and the node modules all .js files should be changed to .ts or .tsx (if the file contains JSX). All new script files should have these file endings.
SIDE NOTE: You can progressively convert an existing code base. Simply create new files in TypeScript while consuming legacy consuming legacy code in JavaScript (typed any).
Add TypeScript Support for Jest
Add ts-jest to your project:
npm install --save-dev ts-jest @types/jest
In package.json add or replace the jest field with the following:
"jest": {
  "preset": "react-native",
  "moduleFileExtensions": [
    "ts",
    "tsx",
    "js"
  ],
  "transform": {
    "^.+\\.(js)$": "<rootDir>/node_modules/babel-jest",
    "\\.(ts|tsx)$": "<rootDir>/node_modules/ts-jest/preprocessor.js"
  },
  "testRegex": "(/__tests__/.*|\\.(test|spec))\\.(ts|tsx|js)$",
  "testPathIgnorePatterns": [
    "\\.snap$",
    "<rootDir>/node_modules/"
  ],
  "cacheDirectory": ".jest/cache"
}
If you're using git you should ignore the .jest/ folder by adding the following into your .gitignore file:
# Jest

.jest/
TypeScript Tooling with Visual Studio Code
To truly benefit from TypeScript you should pair TypeScript tools with your code editor of choice. TypeScript is widely used so there should be plenty of tools for every major code editor.
For Visual Studio Code I recommend the following setup:
- install TSLint plugin
- install Prettier - Code formatter
run:
npm install --save-dev tslint tslint-config-prettier tslint-react
add tslint.json:
{
"extends": ["tslint:recommended", "tslint-react", "tslint-config-prettier"],
"rules": {
  "arrow-parens": false,
  "cyclomatic-complexity": [true, 10],
  "object-literal-sort-keys": false,
  "object-literal-shorthand": false,
  "member-access": false,
  "interface-name": false,
  "no-any": false,
  "jsx-no-lambda": false,
  "no-var-requires": false
  }
}
NOTE: The rules field in tslint.json is optional and you can taylor it to your needs.
Finally copy the following in your Visual Studio Code workspace settings:
{
  "editor.formatOnSave": true,
  "tslint.autoFixOnSave": true,
  "javascript.format.enable": false
}
The TSLint plugin shows TypeScript errors on the fly and also groups and sorts imports for you. The Prettier plugin formats your code. With the workspace settings above you run the code formatting every time the file is saved.
Congratulations!! 🎉
You've set up TypeScript in React Native utilizing the awesome tools VS Code provides. Developing should be a breeze now. :)
If you want to read more about using TypeScript in React Native, check out this blog post about generating React Native documentation using TypeScript and Typedoc: typedoc react.
Sources:
https://www.typescriptlang.org/, https://ionicframework.com/docs/developer-resources/typescript/, https://reactjs.org/docs/static-type-checking.html,
https://reactjs.org/docs/typechecking-with-proptypes.html, https://facebook.github.io/react-native/blog/2018/05/07/using-typescript-with-react-native.html