An introduction to React Navigation: How to configure an app with stacks, tabs, modals and overlays

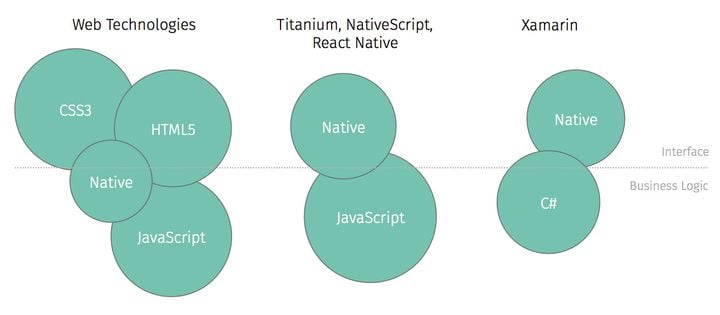
In the React Native ecosystem, one can find many libraries aiming for an app navigation system working seamlessly both on iOS and Android. Contenders include names like React Native Router Flux, React Native Navigation and Native Navigation, but the most advanced one may well be React Navigation, which harnesses the power of a very active open source community to provide a universal native-like navigation system for React Native apps.
In this article, we will dive into some of the basic inner workings of the library, before tackling some of its advanced use cases. All aboard! 👨🏻✈️🚢
Different stacks for different needs
The foundation of React Navigation lies on its stack-based architecture. When setting up your navigation system, one of the first thing you need to do is define your routes, which, in the case of React Navigation, means you need to decide at which level of your stack you will place them.
This will influence how the navigation history is handled as well as which screens should be/can be closed at any given time inside the app.
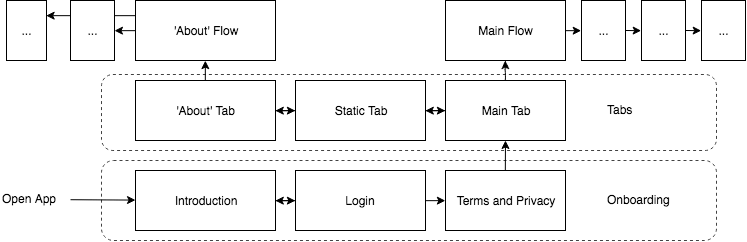
Let’s pretend we have the following flows:
SwitchNavigator
We can see how the different parts of the app have their own navigation logic and their own position in the user experience. We can start defining our Root Navigator which will handle the two main state of the app:
- User is logged out (User can only access the Onboarding flow)
- User is logged in (User can access… everything else!)
When defining our navigator, we have the choice between SwitchNavigator, StackNavigator, TabNavigator and DrawerNavigator. For the purpose of authentication, we prefer SwitchNavigator, as switching from one screen to the other will reset navigation state and history. This will prevent the user from going back to the previous flow.
const RootNavigator = createSwitchNavigator(
  {
    Onboarding: {
      screen: OnboardingNavigator,
    },
    Main: {
      screen: MainNavigator,
    },
  },
  {} // Here we can define navigation options, we'll have a look later.
);

export default class App extends React.Component {
  render() {
    return <RootNavigator />;
  }
}
We now have the big picture in place, the 2 main states of the app. Let’s dive into the Onboarding stack and define its specific screens.
StackNavigator
The StackNavigator retains navigation history, allowing the user to easily go back and forth from one screen to other. That’s what we want for the first two screens of our Onboarding flow: Introduction and Login.
When logged in, the user is redirected to Terms & Privacy but can’t go back to Login or Introduction. Looks like we might need SwitchNavigator again. Let’s code this down.
const OnboardingNavigator = createSwitchNavigator(
  {
    Logged: createStackNavigator({
      TermsAndPrivacy: { screen: TermsAndPrivacyScreen }
    }),
    Unlogged: createStackNavigator(
      {
        Introduction: IntroductionScreen,
        Login: LoginScreen,
      }, {
        initialRouteName: 'Introduction' // First screen the user is redirected to
      }
    )
  }, {
    initialRouteName: 'Unlogged'
  }
);
Note how we get a StackNavigator nested in a SwitchNavigator itself nested in another SwitchNavigator. It’s easy to see where this is going. 🤓
TabNavigator
When the user accepts our Terms and Privacy screen, he is directed to the center piece of our app, the Main section. This section has a special way of handling navigation since it uses a navigation bar at the bottom of our view. Luckily, react-navigation integrates a createBottomTabNavigator method that will handle this for us.
const TabNavigator = createBottomTabNavigator(
  {
    Main: { screen: MainScreen },
    Products: { screen: ProductsScreen },
    About: { screen: AboutScreen }
  },
  {
    tabBarOptions: {
      labelStyle: { fontSize: 20 }
    }
  }
);
DrawerNavigator
What if we realize the tab bar at the bottom takes too much space, and we need a hidden menu, let's say like a Drawer? We can just transpose our code to createDrawerNavigator and have it created for us.
const DrawerNavigator = createDrawerNavigator(
  {
    Main: { screen: MainScreen },
    Products: { screen: ProductsScreen },
    About: { screen: AboutScreen }
  },
  {
    tabBarOptions: {
      labelStyle: { fontSize: 20 }
    }
  }
);
We could also implement a custom menu button and toggle the drawer from it as the library provides dedicated handlers.
this.props.navigation.openDrawer();
this.props.navigation.closeDrawer();
Navigating in our App
Once the backbone of our architecture is complete and our stacks are ready to use, we can command and operate the navigation flow using the navigate prop that is being dispatched to all components declared as screens in our navigators. The same prop can be used to dispatch goBack actions.
Here is an example of implementation in our Login screen, where we assign our Next button an action to navigate towards our TermsAndPrivacy screen. We can pass information from one screen to another using the param object. Let's pass the Username from our user for example.
import React from 'react';
import { StyleSheet, Text, TouchableOpacity, View } from 'react-native';

export default class LoginScreen extends React.Component {
    render() {
        return (
            <View style={styles.container}>
                <Text style={styles.title}>Login</Text>

                <TouchableOpacity onPress={
                    () => this.props.navigation.navigate({
                        routeName: 'TermsAndPrivacy',
                        params: {
                            Login: 'Username'
                        }
                    })
                } style={styles.text}>
                    <Text style={styles.text}>Next</Text>
                </TouchableOpacity>

				<TouchableOpacity onPress={
                    () => this.props.navigation.goBack()
                } style={styles.text}>
                    <Text style={styles.text}>Back</Text>
                </TouchableOpacity>
            </View>
        );
    }
}

const styles = StyleSheet.create({
    container: { flex: 1,   alignItems: 'center', justifyContent: 'center', },
    title: { color: 'black', fontSize: 28, fontWeight: "700", marginBottom: 40 },
    text: {   color: 'black', fontSize: 22 }
});
Navigating back and forth from stacks to stacks will be possible depending on whether the structure is ruled by SwitchNavigators or StackNavigators. This is a good way to enforce a direction to the flow and avoid navigation bugs.
Advanced Use Cases Patterns
Modal screens
Our Onboarding and Tabs stacks done, we want to move on to the Main Flow. Instead of navigating to a new screen in the UX sense of it, we want the app to open a modal form, which usually opens from bottom to top on iOS. As the react-navigation doc gracefully explains:
A modal is like a popup — it's not part of your primary navigation flow — it usually has a different transition, a different way to dismiss it, and is intended to focus on one particular piece of content or interaction.
The implementation is very similar to what we've achieved so far. We want to declare our modal stack screens as part of our Main navigator and toggle the modal mode on its navigation options.
const QuestionsNavigator = createStackNavigator(
  {
    IntroQuestion: IntroQuestionScreen,
    MiddleQuestion: MiddleQuestionScreen,
    EndQuestion: EndQuestionScreen,
  },
  {
    headerMode: 'none'
  }
)

const MainNavigator = createStackNavigator({
  Main: TabNavigator,
  IntroQuestion: QuestionsNavigator,
}, {
    mode: 'modal',
  }
)
And that's it! Our modal stack can painlessly coexists within our parent stack. Dismissing this full screen modal will require to dispatch an action that removes all navigation history before dispatching the goBack action.
<TouchableOpacity onPress={
    () => {
    this.props.navigation.popToTop();
    this.props.navigation.goBack(null);
}} style={styles.text}>
    <Text style={styles.text}>Close Modals</Text>
</TouchableOpacity>

Popover Menus
One of the most interesting use case we've had the chance to work on is to use the navigation action to open popover menus and dialogs on top of our current screen. Specifically, this was used to provide a workaround on an issue affecting the status bar and the modal components on Android.
We will be navigating to it inside a StackNavigator, and set up an infinitely fast transition with a transparent background. Behind the scenes, the app navigate to another screen with a transparent background. But for the user, it looks like a screen on top of another screen.
We will start by setting up a screen the essentially acts up as a backdrop. It will get the component to render as a navigation param.
import React from 'react';
import { View } from 'react-native';
import { NavigationScreenProp } from 'react-navigation';


export default class OverlayScreen extends React.Component {
    render() {
        const content = this.props.navigation.getParam('content');
        return (
            <View
                style={{ flex: 1,  backgroundColor: 'transparent' }}
            >
                {content()}
            </View>
        );
    }
}
In our navigation config, we can create a dummy transition animation that will essentially just allow a transparent background. We then need to attach it to a top level navigator that holds our overlay background as well.
const OverlayNavigator = createStackNavigator(
  {
    root: RootNavigator,
    Overlay: OverlayScreen
  },
  {
    cardStyle: {
      backgroundColor: 'transparent'
    },
    headerMode: 'none',
    transitionConfig: () => ({
      transitionSpec: {
        duration: 0
      },
      screenInterpolator: overlayBackdropTransition
    })
  }
)
Last but not least, let's pretend when we have our own Dialog component and pass some content to our Overlay screen.
renderDialog() {
        return (
            <Dialog onDismiss={() => this.props.navigation.goBack(null)}>
                <Text style={{paddingTop: 20, fontSize: 24, fontWeight: '700' }} >
                    Here is a Dialog...
                </Text>
                <Text style={{ paddingTop: 20,  fontSize: 18 }} >
                    ...Created with react-navigation
                </Text>
                <View style={{ paddingTop: 30, justifyContent: 'space-between' }} >
                    <View style={{ paddingBottom: 10 }} />
                    <TouchableOpacity onPress={
                        () => this.props.navigation.goBack(null)} >
                        <Text>Close</Text>
                    </TouchableOpacity>
                </View>
            </Dialog>)
    }

     render() {
        return (
            <View style={styles.container}>
                <Text style={styles.title}>Welcome!</Text>
                <TouchableOpacity onPress={
                    () => this.props.navigation.navigate('IntroQuestion')
                } style={styles.text}>
                    <Text style={styles.text}>Answer our questions</Text>
                </TouchableOpacity>
                <TouchableOpacity onPress={
                    () => this.props.navigation.navigate({
                        routeName: 'Overlay',
                        params: {
                            content: () => this.renderDialog()
                        }
                    })
                } style={styles.text}>
                    <Text style={styles.text}>Open a Popover</Text>
                </TouchableOpacity>
            </View>
        );
    }
Tadaaa! 🎉 Here it is. A Dialog component fully customizable and made possible using navigation actions.
Hopefully this article helps you have a better understanding of the inner workings of react-navigation. There are many use cases possible to implement a native-like navigation experience on both Android and iOS at the same time.
If you want to read more about development with React Native, check out this blog post about implementing in-app purchases with RevenueCat in React Native or this blog post about implementing app rating with React Native: react-native-rate.