Create a Mobile App for your Shopify Store with React Native

If you have a Shopify store, you are probably already convinced by the power of the e-commerce platform. If you want to bring your store to the next level, creating a mobile app could be exactly what you need!
The benefit of having an app for your Shopify store
If you have a web store that works well already, you might question the need for a mobile app. But let's dive into the benefits of having one, because there a many!
First of all, e-commerce via mobile, more known as m-commerce, represents more than half of all e-commerce sales. Plus, this share is growing every year, and expectations are predicting that this share will keep growing to reach 62% in 2027.
(source: Statista)

This graph underscores the significance of mobile e-commerce. Neglecting this avenue could mean missing out on over half of potential sales and losing ground competitively. If your competitors have an app while you don't, they gain an edge. However, offering an on-demand platform can set you apart from them.
You will also get a few benefits out of it:
- A better customer experience
It’s no coincidence that every big e-commerce website has its own mobile application. This will allow you to offer a personalized experience to your customers, and better accessibility to your store. - A channel for direct communication
If your customers have your mobile application installed, you are able to send them notifications, and have direct access to them. It is a lot more efficient than an email. - Better data insight
When users use your application, they are usually logged in, and you can easily match each user with a specific behavior and analyse their profile.
Now that you are convinced that creating a mobile app from your Shopify store is a good idea, let’s see why React Native is the best solution to do so!
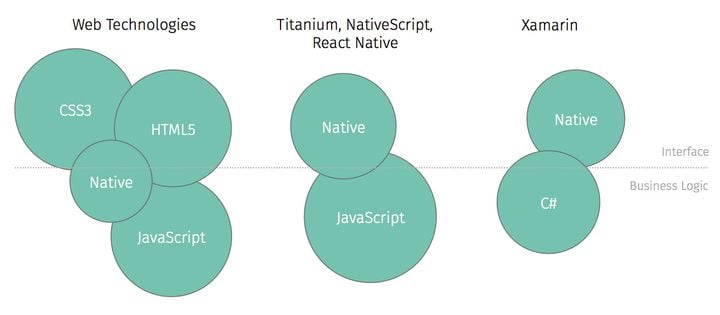
React Native, the best solution for your e-commerce mobile app
If you already trust Shopify for your store, you should also trust them for technical choices. And React Native is the number 1 choice made by Shopify when it comes to mobile applications.
As we can see on the React Native website, Shopify heavily uses the framework for its own mobile apps. All their new applications are made with it. As for their previous applications, they are actively migrating them to React Native, as you can read in this article.
Creating a mobile Shopify store using React Native
Now let's dive into the technical part of this article! We will see how to interact with your Shopify store from a React Native app. We will create a completely customised application and get all the data from your store.
In your Shopify panel:
First, you need to generate a Storefront API access token from Shopify to link it to your React Native app. Follow these steps:
1 - Go to your Shopify store panel and go to Settings (on the bottom part of the left sidebar).
2 - In Settings, choose Apps and sales channels on the left and click on Develop Apps.
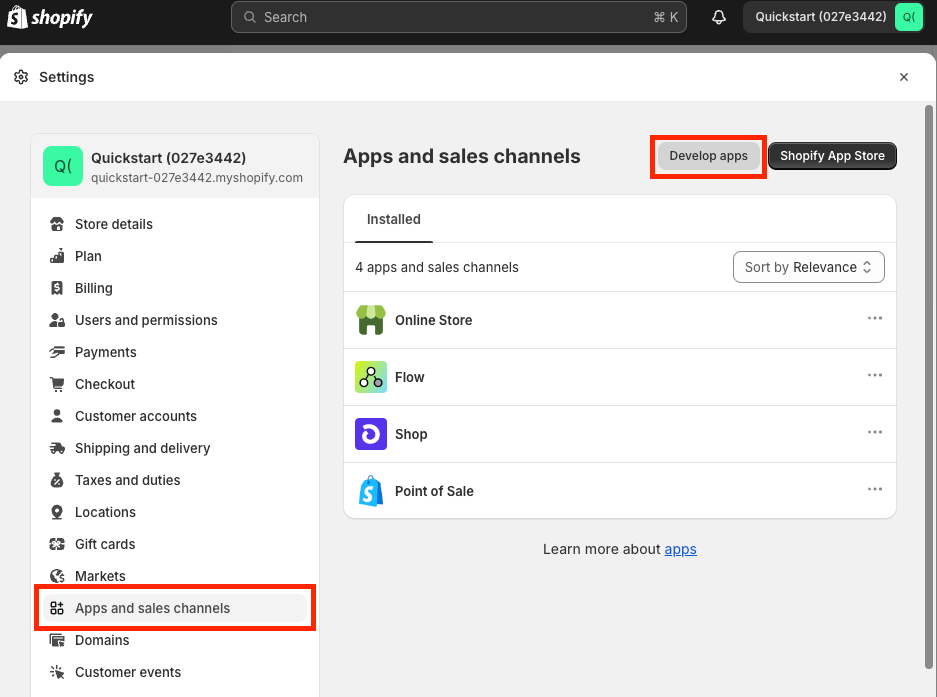
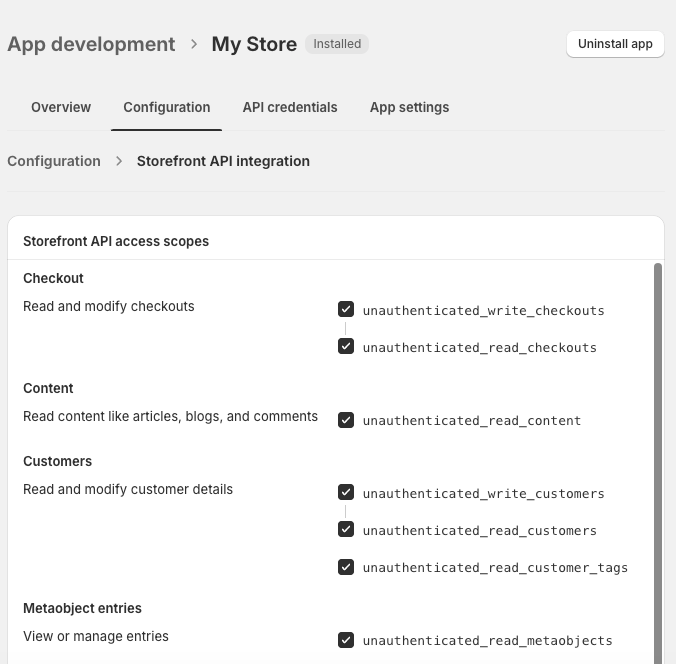
3 - Click on Create an app, name it, and validate it. It will then open the configuration section. Here you can click on Configure Storefront API scopes. In this section you will be able to choose API access levels.
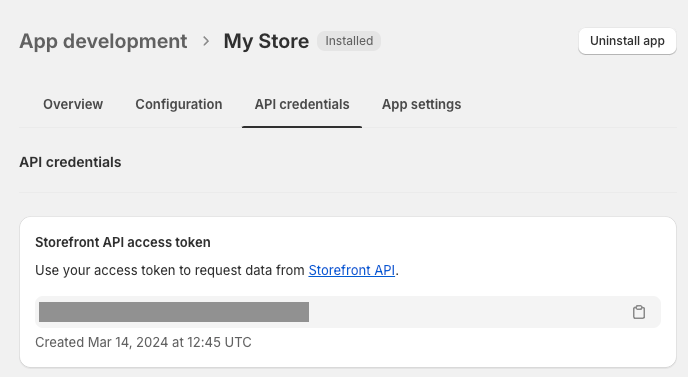
4 - To finish, you can click on the top right to Install app. Once it is installed, you can go to API Credentials to get the Storefront API access token.
Now that you have your Storefront API access token, we can move to the React Native app!
In your React Native application:
1 - First, let's install Shopify Buy SDK, which will allow us to get the data from your store in our App. To do so, run the following command:
npm install shopify-buyOr, if you are using yarn to manage your packages:
yarn add shopify-buy
2 - Then we will create a file for our Shopify functions, somewhere in our src folder.
N.B: You can organize it as you wish (a Shopify folder with a file for each function for example).
import Client from 'shopify-buy';

const client = Client.buildClient({
  domain: 'your-domain',
  storefrontAccessToken: 'your-store-front-access-token'
});

export async function fetchAllProducts() {
  return client.product.fetchAll();
}

export async function fetchSingleProduct(productId) {
  return client.product.fetch(productId);
}
3 - Now you can access the function from your component where you need to load the products, for exampleSales Channels:
import { fetchAllProducts } from '../shopifyFunctions';

interface Product {
  id: string;
  title: string;
  images: { src: string }[];
}

const [products, setProducts] = useState<Product[]>([]);

useEffect(() => {
  const fetchData = async () => {
    try {
      const data = await fetchAllProducts();
      setProducts(data);
    } catch (error) {
      console.error('Error fetching products: ', error);
    }
  };
  fetchData()
}, []);
Listing the products from our store
Once we have loaded all the products from our store into our component state, we can interact with them as we want. As an example, we will just map through our products to display them and add an onPress() function to navigate to the details screen with the product ID as a parameter. We will also add a default picture if the product has no image.
<SafeAreaView>
  <ScrollView
    contentContainerStyle={{
      alignItems: 'center',
      justifyContent: 'center',
    }}
  >
    {products.map((product) => {
      return (
        <TouchableOpacity
          key={product.id}
          onPress={() =>
            navigation.navigate('Details', { id: product.id })
          }
        >
           {product.images && product.images.length > 0 ? (
                <Image
                  source={{ uri: product.images[0].src }}
                />
              ) : (
                <Image
                  source={{
                    uri: 'https://st4.depositphotos.com/14953852/24787/v/450/depositphotos_247872612-stock-illustration-no-image-available-icon-vector.jpg',
                  }}
                />
              )}
          <Text>{product.title}</Text>
        </TouchableOpacity>
      );
    })}
  </ScrollView>
</SafeAreaView>
Get information on a specific product
We can now create the detail page for each product. Thanks to the ID we are passing through navigation, our component will be able to retrieve the correct product using the fetchSingleProduct() we created in the second step. Here is what this Product component will look like:
import { fetchSingleProduct } from '../shopifyFunctions';

interface Product {
  id: string;
  title: string;
  images: { src: string }[];
}

const Product: FunctionComponent<Props> = ({ route, navigation }) => {

  const { id } = route.params;
  const [product, setProduct] = useState<Product[]>([]);

  useEffect(() => {
      const fetchData = async () => {
        try {
          const data = await fetchSingleProduct(id);
          setProduct(data);
          setLoading(false);
        } catch (error) {
          console.error('Error fetching product: ', error);
        }
      };
    fetchData();
  }, []);

  return (
    <View>
      <View>
        {product.images && product.images.length > 0 ? (
          <Image
            source={{ uri: product.images[0].src }}
          />
        ) : (
          <Image
            source={{
              uri: 'https://st4.depositphotos.com/14953852/24787/v/450/depositphotos_247872612-stock-illustration-no-image-available-icon-vector.jpg',
            }}
          />
        )}
        <Text>
          {product.variants[0].price.amount}{' '}
          {product.variants[0].price.currencyCode}
        </Text>
        <Text>{product.title}</Text>
        <Text>{product.description}</Text>
      </View>
      <View>
        <TextInput
          keyboardType="numeric"
          value={quantity}
          onChangeText={updateQuantity}
          placeholder="Quantity"
        />
        <TouchableOpacity onPress={addToCart}>
          <Text>Add to Cart</Text>
        </TouchableOpacity>
      </View>
      )}
    </View>
  );

}
As you can see, we load the data with the fetchSingleProduct() method we created in step 2 and the ID of the product that we're getting from the route parameters. We can then display the information from the product on our screen:
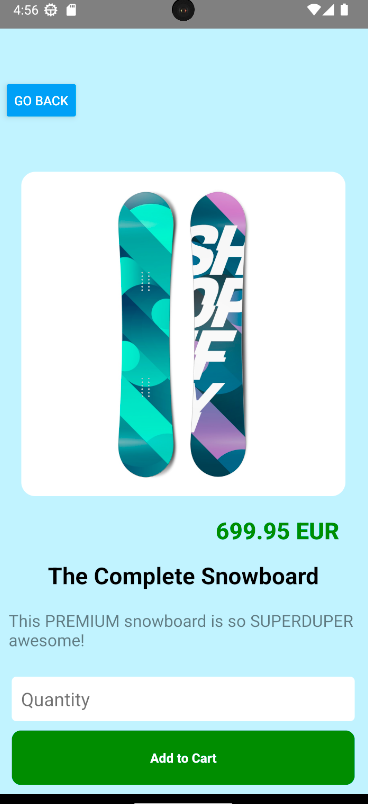
NB: To keep it simple, we are not handling the product variants here. But of course, if you have variants of a product (color, size...), it can easily be handled in the app as well. Actually, everything is handled as a variant in the Shopify API. If a product has no variation in your Shopify panel, the API will treat this product as a product with one variant which will store the product's information, like the price for example (this is why our code above is referring to product.variants[0].price.amount).
Create a checkout
To be able to handle a cart, you first need to create a checkout. A checkout encompasses everything necessary to make a transaction (items in the cart, prices, taxes, shipping address etc...). A good thing to do is to store the checkout ID in a persistent storage (e.g. using AsyncStorage or a state management framework like Redux). This way, we can easily retrieve the users cart if he leaves the application and comes back.
Let's start by adding a new function in our Shopify file:
export async function createCheckout() {
  const checkout = await client.checkout.create();
  return checkout.id;
}
With this, we can create a checkout and keep the ID in our persistent storage. Here, we chose to use Redux:
import { createCheckout } from '../shopifyFunctions';
const checkoutId = useSelector(selectCheckoutIds);

if (checkoutId === null) {
  const check = await createCheckout();
  dispatch(setId(check));
}
Once we have a checkout created for our user, we can return to our Product component and manage the addition of a product to the cart.
Add a product to the cart
First, we need the Shopify function to add an item to the cart:
export async function addItem(checkoutId, item) {
  return client.checkout.addLineItems(checkoutId, item);
}
In our Product component, we already have the button that calls the addToCart() function, but we still need to write the function. We will need to import the addItem() function we wrote above in our component. It takes 2 parameters, the checkout ID and an item. You already know that the checkoutId is necessary to identify the cart we want to add the item in. The item parameter is the product itself. Let's see what this item should look like by writing the function:
import { addItem } from '../shopifyFunctions';
const checkoutId = useSelector(selectCheckoutIds);

const addToCart = async () => {
  const item = {
    variantId: product.variants[0].id,
    quantity: parseInt(quantity),
  };
  const ret = await addItem(checkoutId, item);
};
As we mentioned earlier, the Shopify API handles cart products as variants, so our item object needs the variant ID to know what product (and/or variant of this product, if it exists) we're adding to the cart. Then we need to specify how much of it we want to add, and that's it! With the variant ID, the API will be able to retrieve all the information needed, like the price for example. Now that we can add products to the cart via our Shopify checkout, we will create a Cart component to list all the added items.
Listing checkout items
We will create the Cart component to list all the products in the checkout.
import { fetchCheckout } from '../shopifyFunctions';

interface Cart {
  id: String;
  items: [{ title: String; id: String; quantity: Number }];
  price: Number;
}

const Cart: FunctionComponent = ({}) => {
  const [cart, setCart] = useState<Cart>();
  const checkoutId = useSelector(selectCheckoutIds);
  const numbers = Array.from({ length: 100 }, (_, i) => i);

  useEffect(() => {
    const fetchData = async () => {
      const data = await fetchCheckout(checkoutId);
      const newCart: Cart = {
        id: data.id,
        items: data.lineItems.map((lineItem: any) => ({
          id: lineItem.id,
          title: lineItem.title,
          quantity: lineItem.quantity,
        })),
        price: data.totalPrice.amount,
      };
      setCart(newCart);
    };
    fetchData();
  }, []);

  return(
    <SafeAreaView>
      <ScrollView>
        <View>
          <Text>Product</Text>
          <Text>Quantity</Text>
        </View>
        {cart?.items.map((lineItem: any) => (
          <View key={lineItem.id}>
            <Text>{lineItem.title}</Text>
            <Picker
              selectedValue={lineItem.quantity}
              onValueChange={(itemValue, itemIndex) => {
                updateQuantity(lineItem.id, itemValue);
              }}
            >
              {numbers.map((number) => (
                <Picker.Item
                  key={number}
                  label={number.toString()}
                  value={number}
                />
              ))}
            </Picker>
          </View>
        ))}
      </ScrollView>
      <View>
        <Text>TOTAL</Text>
        <Text>{cart.price} €</Text>
      </View>
    </SafeAreaView>
  )
}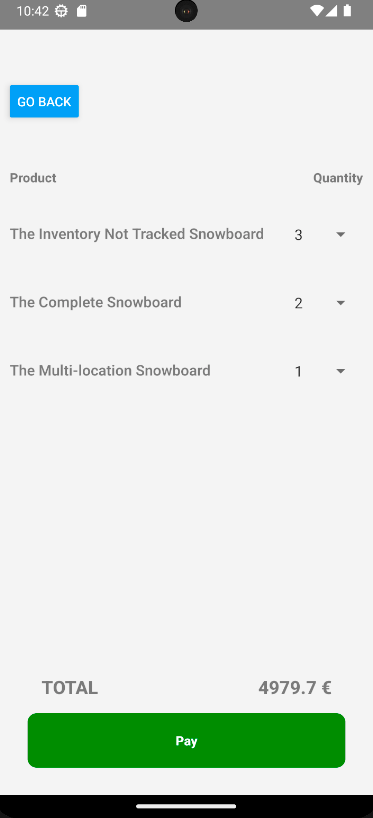
All the products we added to the cart will be retrieved here, with their quantity and the total price automatically calculated. If you noticed, we are already calling the updateQuantity() on our quantity selectors. Let's now implement it so we can change the quantity of a product in the checkout.
Updating checkout items
Same process, we first write the function in our Shopify file:
export async function updateItem(checkoutId, lineItemToUpdate) {
  return client.checkout.updateLineItems(checkoutId, lineItemToUpdate);
}
As you can see, the update function is pretty simple. We identify our checkout by passing the ID as a parameter, then we give the item(s) we want to update with the values we want to update. As we just want to update the quantity here, our item will be the id of this item, and the quantity.
const updateQuantity = async (itemId: String, newQuantity: number) => {
    const item = [
      {
        id: itemId,
        quantity: newQuantity,
      },
    ];

    const data = await updateItem(checkoutId, item);

    const updatedCart: Cart = {
      id: data.id,
      items: data.lineItems.map((lineItem: any) => ({
        id: lineItem.id,
        title: lineItem.title,
        quantity: lineItem.quantity,
      })),
      price: data.totalPrice.amount,
    };

    setCart(updatedCart);
  };
In this function, we are also updating our local state of the cart with the items returned from the updateItem() function.
NB: If you're setting up the quantity to 0, it will actually delete the line item from the checkout. The Shopify API also comes with the removeLineItems() function, that can directly delete the item from the checkout by just passing the ID.
Complete the transaction
This is our last step; now that we have all our articles in the cart and saved in our checkout, we need to complete it by finalising the transaction. Lucky for us, Shopify takes care of it all, so we don't even have to deal with the sensitive data. Indeed, the checkout (the API object with all the information we need to create the transaction) comes with a webUrl property. This is a URL that contains all the checkout information (items in the cart, quantity, etc...) that redirects to the form to terminate a transaction:
Of course, as we want to handle everything inside our mobile application, we will integrate this URL into our app by using React Native Webview. This package will allow us to render web content inside our application.
To do so, you need to install the package if you don't already have it:
npm install react-native-webviewNow that we have the package, the idea is to create a component that will retrieve the content of the checkout URL. But before creating this component, we will update our cart state in our Cart component to include the webUrl in it, so we can easily pass it as a route parameter to navigate to our WebView component.
 const newCart: Cart = {
    id: data.id,
    items: data.lineItems.map((lineItem: any) => ({
      id: lineItem.id,
      title: lineItem.title,
      quantity: lineItem.quantity,
    })),
    price: data.totalPrice.amount,
    checkoutUrl: data.webUrl, // <= add the webUrl to our cart state
  };
Our Cart component already contains a pay button, we are going to use it to navigate to the WebView component:
<TouchableOpacity
  onPress={() => {
    navigation.navigate('Checkout', { uri: cart?.checkoutUrl });
  }}
>
  <Text>Pay</Text>
</TouchableOpacity>
Time to create the component:
import { WebView } from 'react-native-webview';

const WebViewScreen: FunctionComponent<Props> = ({ route }) => {
  const { uri } = route.params;
  return <WebView source={{ uri }} />;
};
This is quite simple, the WebView component takes care of it all, and retrieves the content in the URL we passed as a parameter.
As you can see, we are displaying the URL content inside our mobile application. From there, the user can finish the transaction. Shopify takes care of it all!
Here is a video of what the different features we implemented in this article look like:
App demo
This was just a basic example to understand how to use Shopify Buy SDK with your React Native app. You can of course do a lot more, like update a Shipping address, add a discount, etc... Feel free to check out the Shopify Buy SDK documentation to see the different functions you can integrate into your app.
Remember that depending on the actions you want to do or the data you want to access in your app, you have to authorise it first in your Shopify Panel (step 3).
Whether you're exploring use cases or ready to discuss building your own app, we're here to help! Contact us here!