Getting started with React Navigation v5: How To Navigate in React Native

React Navigation has long grown from a community project to becoming the most popular solution for implementing a navigation system to a React Native app. Throughout this time, the library has seen many new features and bug fixes implemented, solidifying its position as the standard solution for navigation in React Native apps.
Its biggest update so far was released in 2020 in the form of React Navigation v5, a long refactoring effort from the team which, aside from addressing some common pain points of past releases, substantially changes the API of the library and hopes to improve its performance and ease of use. A big part of the vision has been to align React Navigation with some of the most recent React features and best practices such as hooks, functional components and a component based architecture.
In this article we will build a simple app navigation flow using React Navigation and dive into its inner workings.
The stacks model
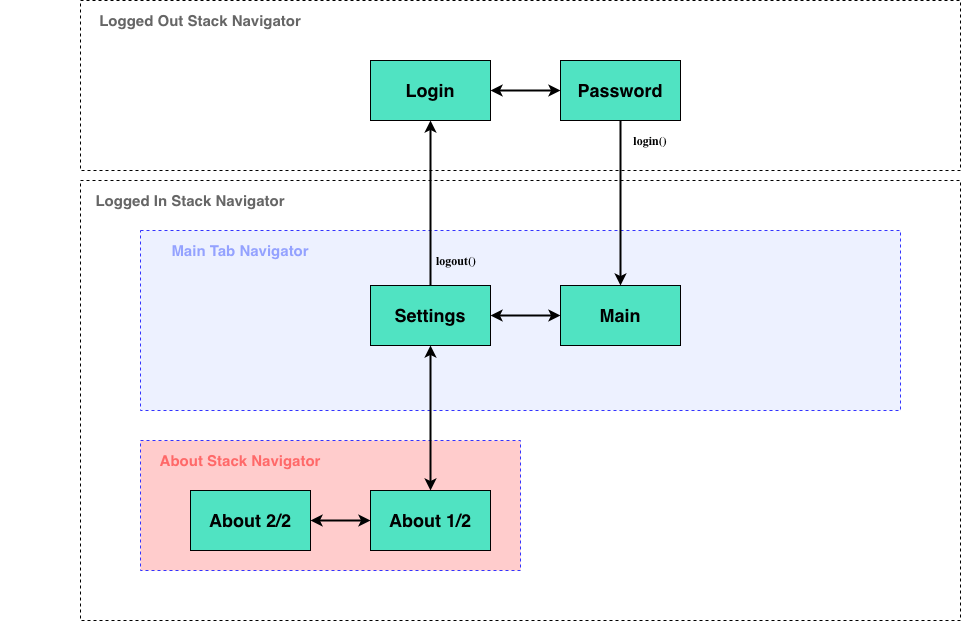
A big design choice of React Navigation is its use of stacks and the need for developers to understand when to nest them properly. Let's pretend we are trying to build a simple app with the following navigation flow.
Let's first install all required packages.
$ npm install @react-navigation/native npm install react-native-reanimated react-native-gesture-handler react-native-screens react-native-safe-area-context @react-native-community/masked-view
$ cd ios && pod install
For this example, we will use two types of navigators: A Stack navigator and a Tab navigator. Let's go ahead and install the corresponding packages.
$ npm install @react-navigation/stack @react-navigation/bottom-tabs
Once all our dependencies are installed, we need to wrap the whole app in NavigationContainer.
const AppRoot = () => {
  return (
    <>
      <NavigationContainer>
        <App />
      </NavigationContainer>
    </>
  )
}
We can now start implementing our top-level stacks. Our user exists in two states: Authenticated or not. In order to keep the user locked in either of those two flows, we separate them into two different stack navigators.
export type AppStackParamList = {
  LoggedIn: undefined
  LoggedOut: undefined
}

const Stack = createStackNavigator<AppStackParamList>()

const App = () => {
  const isAuthenticated = useIsAuthenticated()
  return (
    <>
      <Stack.Navigator>
        {isAuthenticated ? (
          <Stack.Screen name="LoggedIn" component={LoggedInNavigator} />
        ) : (
          <Stack.Screen name="LoggedOut" component={LoggedOutNavigator} />
        )}
      </Stack.Navigator>
    </>
  )
}
Let's focus first on our LoggedOutNavigator, where the user will enter his login and then his password, he will finally be authenticated and redirected automatically to the second stack navigator as soon as his authentication status changes.
Inside the navigator, we define two different screens.
export type LoggedInStackParamList = {
  Username: undefined
  Password: {
    username: string
  }
}

const Stack = createStackNavigator<LoggedInStackParamList>()

const LoggedInNavigator = () => {
  return (
    <>
      <Stack.Navigator>
        <Stack.Screen name="Username" component={UsernameScreen} />
        <Stack.Screen name="Password" component={PasswordScreen} />
      </Stack.Navigator>
    </>
  )
}
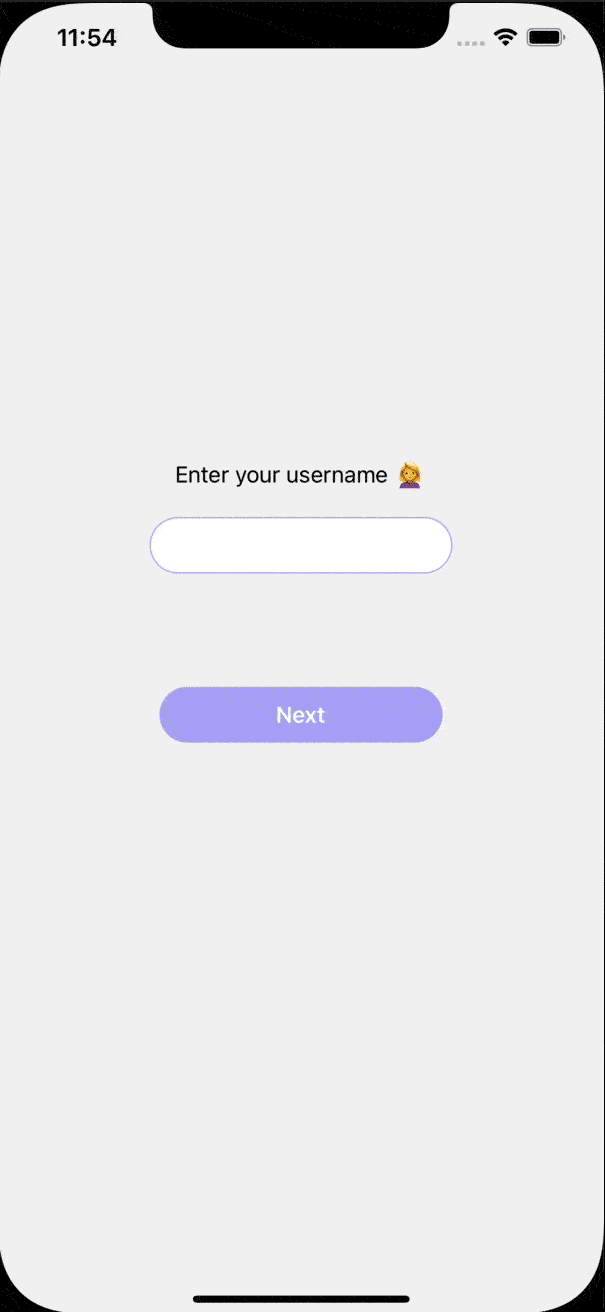
Our Username screen will take care of passing the username value to our second screen, notice how we use the navigation Hook to navigate to the password screen as well as pass a parameter to it!
Let's note that the new useNavigation hook entirely replaced the need to use the navigation prop or the Higher Order Component that were both previously present in React Navigation. We can also note the presence of similarly new introduced hooks that streamlines the API to this type of declarative workflow: useIsFocused, useLinking or useScrollToTop.
In the following screen, we do access the username property thanks to the useRoute hook. Together with the password, this allows us to perform an authentication and eventually update our global authentication status if this succeeds.
type NavProp = StackNavigationProp<LoggedInStackParamList, "Username">
const UsernameScreen: FunctionComponent = () => {
const [username, setUsername] = useState("")
const navigation = useNavigation<NavProp>()
return (
<View style={styles.container}>
<Text style={styles.text}>Enter your username 🙍♀️</Text>
<TextInput
style={styles.textInput}
value={username}
onChangeText={setUsername}
/>
<Button
onPress={() =>
navigation.navigate("Password", {
username
})
}
title={"Next"}
/>
</View>
)
}
const PasswordScreen: FunctionComponent = () => {
const [password, setPassword] = useState("")
const route = useRoute<RouteProp<LoggedOutStackParamList, "Password">>()
return (
<View style={styles.container}>
<View style={styles.textContainer}>
<Text style={styles.text}>Hello {route.params.username}!</Text>
<Text style={styles.text}>Enter your password securely 👩💻</Text>
</View>
<TextInput
style={styles.textInput}
secureTextEntry
value={password}
onChangeText={setPassword}
/>
<Button
onPress={() => authenticate(route.params.username, password)}
title={"Login"}
/>
</View>
)
}
We can see how we added a goBack() action here for good measure, if the user needs to re-enter his username he can navigate to the previous screen in the stack.
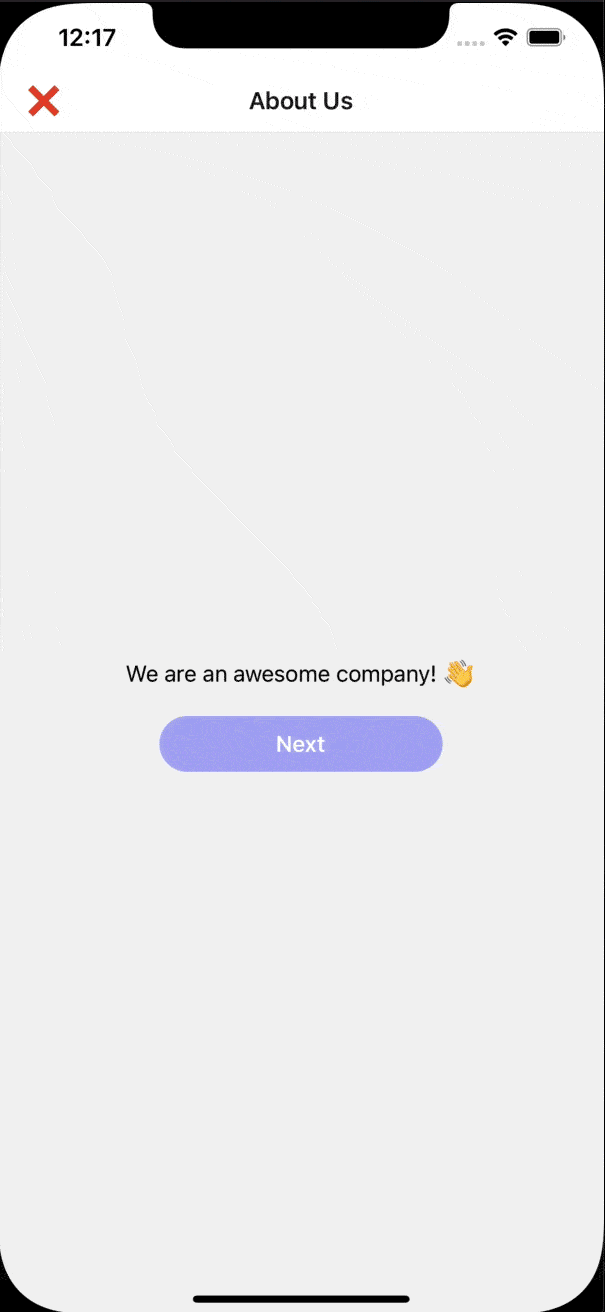
When our user is successfully authenticated, the app will automatically switch from the LoggedInNavigator to the LoggedOutNavigator. But we haven't created anything for this navigator yet, so let's dive into it and create a Tab navigation system that holds two screens, as well as another Stack navigator for the About Us section. We are also slightly customizing our tab bar to have an icon and a text label.
We do not want the About Us screens to show up inside our Tab navigation flow, that's why it's important here to separate our concerns. Even though we are navigating to the About Us section from the Tab Bar, the About Us screens should sit outside of the Tab navigator.
const TabNavigator = () => {
  return (
    <>
      <Tab.Navigator
        tabBarOptions={{
          labelStyle: {
            fontSize: 14
          }
        }}
      >
        <Tab.Screen
          name="Home"
          component={HomeScreen}
          options={{
            title: "Home",
            tabBarIcon: () => <Text style={{ fontSize: 26 }}>🏠</Text>
          }}
        />
        <Tab.Screen
          name="Settings"
          component={SettingsScreen}
          options={{
            title: "Settings",
            tabBarIcon: () => <Text style={{ fontSize: 26 }}>⚙️</Text>
          }}
        />
      </Tab.Navigator>
    </>
  )
}

const AboutUsNavigator = () => {
  return (
    <>
      <Stack.Navigator screenOptions={{ headerShown: false }}>
        <Stack.Screen name={"AboutUsOne"} component={AboutUsOne} />
        <Stack.Screen name={"AboutUsTwo"} component={AboutUsTwo} />
      </Stack.Navigator>
    </>
  )
}

const LoggedInNavigator = () => {
  return (
    <Stack.Navigator screenOptions={{ headerShown: false }}>
      <Stack.Screen name={"Tab"} component={TabNavigator} />
      <Stack.Screen name={"AboutUs"} component={AboutUsNavigator} />
    </Stack.Navigator>
  )
}
We are now fully navigating back and forth between the LoggedIn and LoggedOut navigators, provided that we have a logout function we can call from the Settings screen.
Opening the About Us navigator will also open a new screen outside of the tab navigation system, which we can close using the the goBack() action.
Advanced Use Cases
One of the main difficulties working with navigators can be working with headers and updating them dynamically. Luckily, v5 introduces a new way to update screen options from the component itself. Removing the need to over-specify them in our corresponding navigators.
Let's try and add some headers to our About Us screens, but let's make it so the first screen has a custom close button while the second has a custom back button. Let's step it up a notch and let's add a counter that updates the header dynamically in the second screen.
const AboutUsNavigator = () => {
  return (
    <Stack.Navigator screenOptions={{ headerShown: true }}>
      <Stack.Screen
        name={"AboutUsOne"}
        component={AboutUsOne}
        options={{
          headerBackTitleVisible: false,
          title: "About Us",
          headerBackImage: props => (
            <Text
              style={{
                paddingLeft: 20,
                fontSize: 20
              }}
            >
              ❌
            </Text>
          )
        }}
      />
      <Stack.Screen
        name={"AboutUsTwo"}
        component={AboutUsTwo}
        options={{
          headerBackTitleVisible: false,
          title: "Show your support!",
          headerBackImage: props => (
            <Text
              style={{
                paddingLeft: 20,
                fontSize: 30
              }}
            >
              👈
            </Text>
          )
        }}
      />
    </Stack.Navigator>
  )
}
We now have some nice custom navigation icons as well as custom titles for both of these screens. In order to update the header in the second screen, we can use the setOptions function directly in the component, which allows for dynamically interacting with the header.
const AboutUsTwo: FunctionComponent = () => {
const [counter, setCounter] = useState(0)
const navigation = useNavigation()
return (
<View style={styles.container}>
<Text style={styles.text}>Thanks for reading. 🙇♂️</Text>
<TouchableOpacity
onPress={() => {
const newCount = counter + 1
setCounter(newCount)
navigation.setOptions({
title: `${newCount} thank yous!`
})
}}
>
<Text style={styles.heart}>💙</Text>
</TouchableOpacity>
</View>
)
}
We are now seeing the header being updated as we interact with the screen button.
Going deeper
This article covered some of the many popular use cases, but there is a few more features we haven't covered. Creating a Drawer navigator with createDrawerNavigator, creating modals, making use of the useFocused hooks are all very interesting and useful features that React Navigation cover very well in their own documentation.
If your app is already using an older version of the library, they even created a thorough guide to help ease the transition from the older API to the component based system. The developers already familiar with the concepts will easily pick up the new additions while gaining in flexibility thanks to newly introduced hooks and overall improved surface API.
Last but not least, it is important to mention that v5 now almost fully exports type definitions and encourages type-checking to help TypeScript developers bring even more robustness to their app.
Going forward, we will have a close look the team's roadmap to v6, which promises to keep improving on the solid foundations of the library.